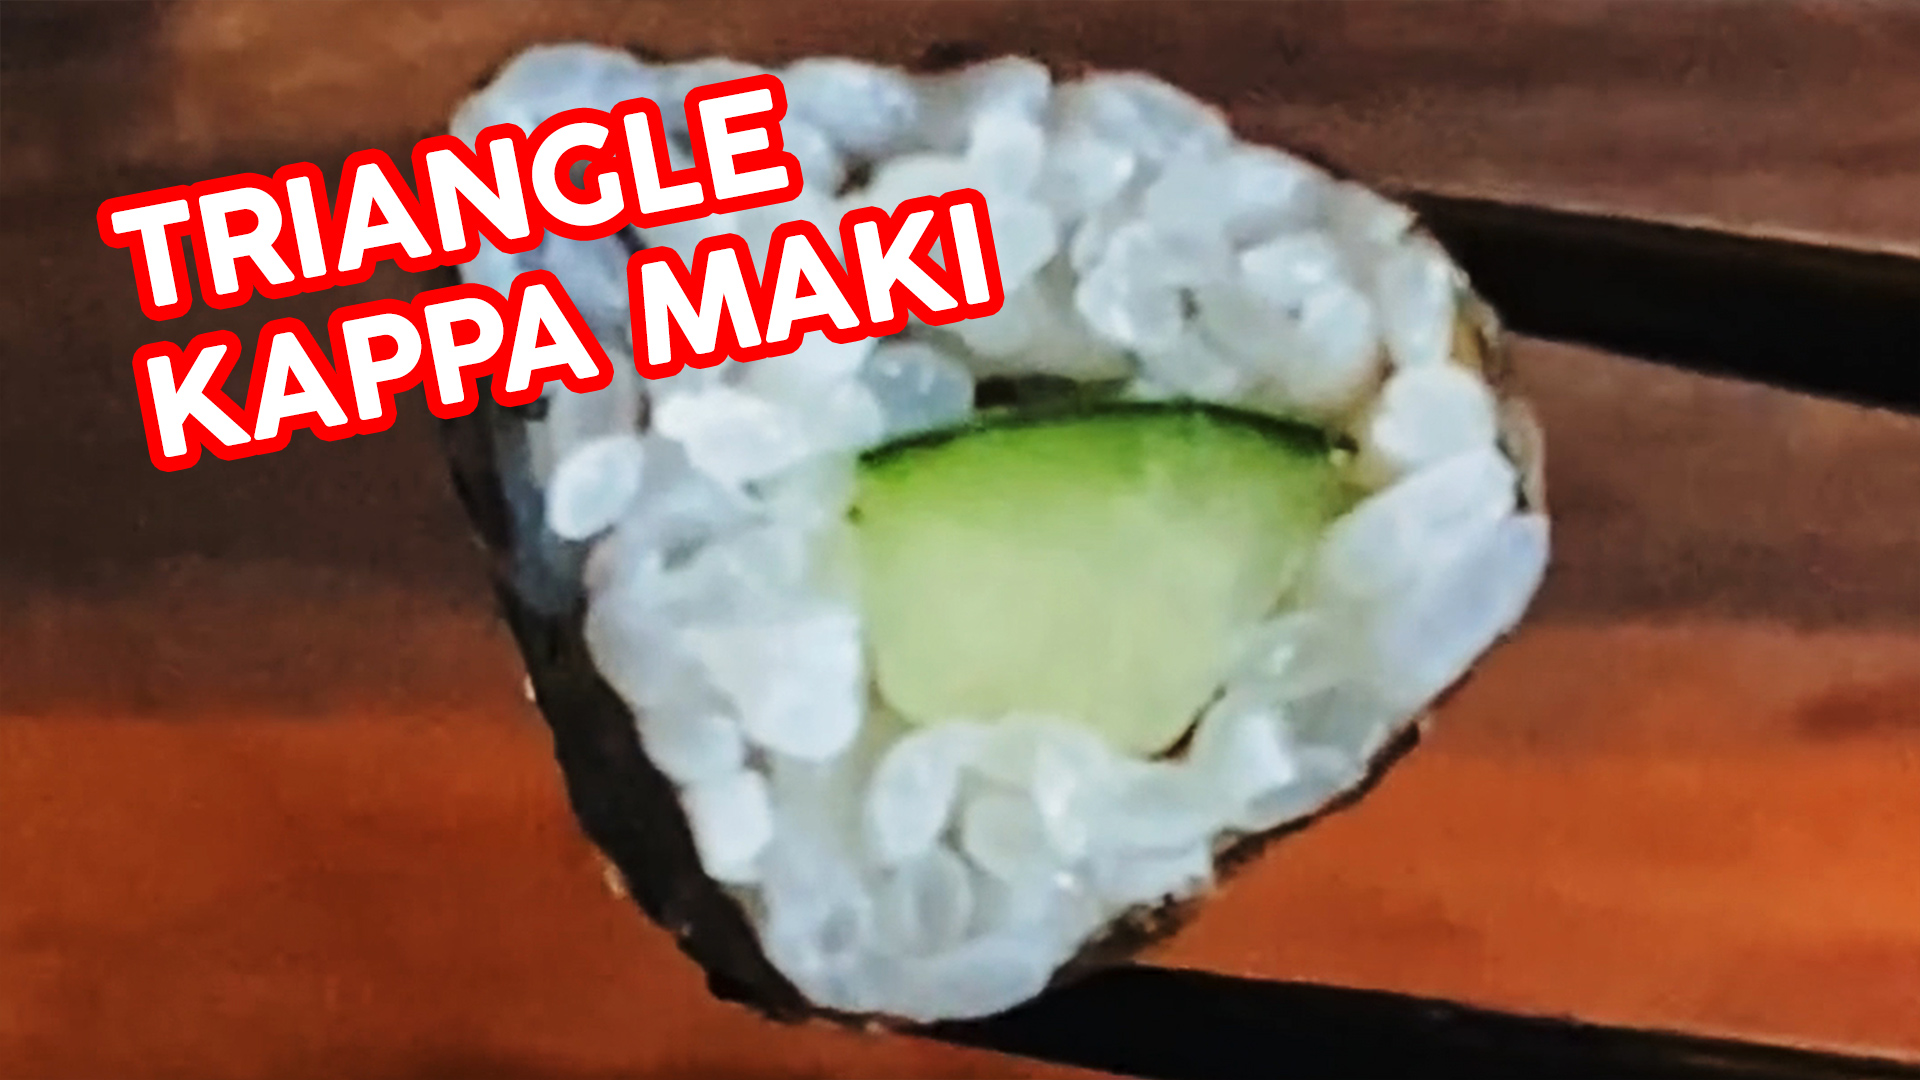
I’m trying to shape it into a triangle this time, and you know, this is a lot harder than it looks.
This is why, on social media and everywhere, I’m always pushing the idea of making and sharing your “shitty art”.
It would be super easy to just get frustrated because I don’t know what I’m doing, and I’m really bad at this, and none of my sushi is turning out right.
But it’s okay. It’s shit, and I know it’s shit, and it’s supposed to be shit, because you can’t get to good without going through the shit bits first!
But if you can be okay with the shit, and keep going, you’ll probably be surprised at how fast your shitty art stops being shitty.
At least, that’s what I’m telling myself about the sushi.
I just can’t get away from sushi. Every time I start a new project, it always comes back to sushi.
So… uh… heh. We’re doing sushi again.
This time around, my husband had the idea to do kazari sushi. This is the kind of sushi where it’s rolled so that when you slice it, you get a cool design or picture.
But here’s the problem. I’m really, really bad at it.
But you know what, that’s okay, because practice makes perfect, right?
The basis of all kazari sushi designs is different shapes, so we’re going to start by attempting some shapes.
It’s so weird to look back and realize my birthday was only a week ago?!
It feels like it’s been a month.
We don’t usually do much for birthdays around here, but I was feeling a little sad that the normal minor stuff is off the table this year – you know how it is.
So Son made me instant ramen (with a hard boiled egg that happened to be in the fridge, imitation crab, and nori). It’s the little things.
Our thai basil is flowering. Gardening video coming up soon!
Birthday WoW and a pistachio cupcake my mom made me! It was so fluffy and so delicious.
Son wanted to have a candle for my birthday pudding, but we couldn’t find any around the house (aside from a couple of tea candles). I texted my mom, and she responded, “let’s facetime so you can pick which ones you want…”
Turns out she has an entire shoebox filled with every single birthday candle she ever got since I was a baby, so there were OPTIONS.
I picked these rainbow polka dot ones. I’m never gonna have to buy candles again.
Birthday dinner! Instead of presents, my mom cooks for us. Normally we ask for cake, but this year (since I was already planning on making something sweet) I asked her to make my grandma’s teriyaki chicken recipe.
This is my happy place.
Surprise cake showed up at our door!
Son’s brother’s girlfriend ordered cake to be delivered from a local bakery.
It’s our local neighborhood gargoyle.
Treeshroom.
It’s been super gloomy all week. Fall is finally here!
It smelled like rain. But alas, only a few overnight sprinkles.
Found the grass’ ass.
Pita chips!
This was *supposed* to be a picture of brussels sprouts.
It was maybe a little dark in the kitchen.
I’m entirely losing track of what day it is, we’ve just been going going going with filming and such… hence the late post.
Hope you have a good week… and don’t forget to vote if you’re in the US and able to!
A spooky, but incredibly tasty, riff on a po’ boy sandwich? Today we are making the Edgar Allan Poe-boy sandwich from Code Romantic!
In a post-apocalyptic world that’s been taken over the @ware, you need to learn to code in order to reprogram the evil AI that has taken over and is killing humanity.
That’s the premise behind Code Romantic – a romantic visual novel that teaches you to code, created by my friend Miko!
When I first started tossing around the idea of developing food from indie games, I knew I wanted to see if there was something I could make out of Code Romantic. After all – the whole point behind this is supporting indie game companies while ALSO getting to be really creative with food, and what better game than one that was developed by a good friend?
I played through the entire game, for… you know… research… and it is just. so. good.
THAT ENDING THOUGH. MIKO.
We decided upon the Poe Boy Sandwich, which comes from Cup of Poe – an Edgar Allen Poe-themed cafe inside the Literary Land theme park where most of the story is based.
Her one suggestion was that it be spooky… and I can work with that!
I decided to riff off of this recipe from Lady and Pups, because it looks DELICIOUS, and is interesting enough to – in my mind at least – deserve the moniker of an Edgar Allen Poe-boy sandwich. We’ll get to the spooky in a moment.
We’ll start by making the tartar sauce.
This sauce starts with a base of mayonnaise – we’re using classic, creamy Best Foods here.
Then a hard-boiled egg, peeled and finely chopped. This is one of the several ingredients that will pump up the umami in the sauce, and adds to the richness as well.
And then, anise-scented thai basil! We bought a bunch online, and we’re actually in the process of propagating and planting it! I know we’ve been slacking a little on creating gardening videos, BUT we’re filming the entire process of growing our Thai basil, so there definitely will be a gardening video soon – and there will be a link up here when it’s available! Hopefully there will be a TON of Thai basil in our future, because while we may not be huge fans of black licorice, we really do love this fragrant, licoricey herb.
Next, we’re adding the creepy to this Edgar Allen Poe-boy sandwich. The original recipe called for anchovies, and if you’re making this at home you can go with that or even leave them out – it’s up to you! But for me, this was the perfect place to substitute in a tablespoon of squid ink – you’ll get the same fishy umami in the end result, but it’ll turn your sauce a spooky black color too.
Finely chop up a tablespoon of pickled jalapeños, for a mild and slightly tangy spice.
Then, half a tablespoon of chopped capers – these will add even MORE umami to your sauce, as well as a salty little pop.
We also want the bite of some finely minced shallots – we’re covering nearly every flavor component in this dish!
A little Dijon mustard rounds out the sauce by adding a faintly vinegary spice.
The recipe calls for lime juice, but I happened to have the opportunity to buy some finger limes! If you haven’t seen them before, finger limes are just the coolest little creepy food. They’re shaped like fingers, but if you break one open and squeeze it, all these little pearls of lime juice ooze out, looking like little pink fish eggs. They are a delightfully tart little pop in your mouth, but they’re not quite as strong as normal lime juice. I squeezed out the pearls and added them as-is to the sauce – the little pops of tartness as you eat it are a lot of fun!
Lastly, a little freshly ground black pepper for that subtle earthy spice.
Mix that all together, really really well – you’ll see it go from a rainbow of colors to totally black! Then pop it in the fridge, and let the flavors combine while you prepare the sandwich fillings.
Now we’re on to the breading!
Mandy’s original recipe for fried oysters is based off of Tawianese-style fried foods – which use Taiwanese tapioca flour. It’s a bit different from the tapioca flour you find elsewhere, in that there are larger bits in it that add some crunch.
So her recipe mimics that by using a combination of tapioca flour, fine cornmeal, and coarse cornmeal for that extra crunch. The combination results in a very light but very crunchy crust. Do not leave out that coarse cornmeal, those crunchy bits are so good!
Then, for flavor, we add in salt, ground black pepper, AND ground white pepper. The sharper black pepper and earthier white pepper both add the complexity of flavor here.
Whisk that all together, and that’s it for your breading!
A couple more things to do before we fry:
Pour about half a cup of whole milk in another small bowl.
Finely mince a couple of cloves of garlic, and add those to a large bowl. We’ll be using this after we fry.
And now it’s time for frying! Heat a couple of inches of oil – vegetable, canola, or peanut would work well here – in a heavy-bottomed pot or deep pan. I aimed for around 350F, but you can also tell it’s ready if bubbles form around a wooden chopstick or spoon handle when you place it in the hot oil.
Instead of oysters, I decided to use shimeji mushrooms. They’ve got a cute little round shape that will work well for this, and there’s always something a little spooky about mushrooms. Plus, I figured they might be more readily available in a post-apocalyptic world!
Cut off the caps, and dip them in the milk. Then drain them a little, and coat them in the breading.
When you place them in the oil, they’ll spatter a good bit. But since I didn’t have a problem with them sticking to each other, I found that I could add a bunch at one time and immediately cover it with a lid or splatter screen.
Cook them until the popping sounds subside, and they’re golden-brown. Remove with a slotted spoon, let the oil drain a little, and transfer to the bowl with the chopped garlic. Repeat with the rest of the mushroom caps. (You can also cook the stems like this, if you’d like – they have more of a lobster-like texture than the caps, and we found them to be really tasty!)
Once all your mushrooms are cooked, it’s time to fry your Thai basil! Wash and thoroughly dry a big handful or so of Thai basil, and then add it all at once to your frying oil. These will pop LIKE CRAZY, way more than the mushrooms did – we both got splattered with hot oil. Make sure you have your lid or splatter screen ready to go, and cover the pot immediately!
It won’t be long until the popping and sizzling subside entirely, and that means it’s time to remove your Thai basil leaves from the oil, drain them, and add them to the bowl with your mushrooms and garlic.
Add a little salt, ground white pepper, and ground black pepper to the bowl, to make sure everything is well seasoned… and then toss it all together!
Try not to snack on too many – I know you’re getting your fingers in there – because it’s finally time to make your sandwich!
You can make this with an Italian hero roll, french bread, or ciabatta… OR you can check out our Sushi Labs from last week and make your own NOLA french bread! We went with the King Arthur recipe for our sandwiches.
Lightly toast your bread, then slice it in half and remove some of the bread from the center of your rolls. This will give more room in the middle for your fillings, and result in a less bready sandwich.
Generously spread both halves of the roll with the squid ink tartar sauce that we made.
And then fill it with as many of the fried mushrooms as will fit.
Close the sandwich, and serve with more finger lime (or lime juice) and tabasco sauce – and enjoy this messy, spooky, incredibly delicious sandwich!
And if you know anyone else who would love this spooky but oh so tasty sandwich, don’t forget to share the love, and send them a link to this post too!
To make the tartar sauce: Mix together all the ingredients evenly, then let sit in the fridge for at least 1 hour for flavours to combine.
To make the poe boy: Whisk evenly all the ingredients under “Breading” except the milk, and set aside. Rinse the Thai basil leaves clean then dab-dry with a clean towel, set aside. Clean your mushrooms and remove stems and/or roots. Place the minced garlic in another large bowl for tossing together later with the fried mushrooms. Slice the roll open, and remove some of the excess bread inside to make room for the fillings.
Heat 2″ of vegetable oil in a pot over medium-high heat (if it starts bubbling up quickly around a wooden chopstick that’s inserted into the middle, the oil is ready). Dip the mushrooms in the milk, then coat them evenly with the breading. You can do several at a time. Gently lower the breaded mushrooms into the oil, and cover with the lid or a splatter screen to avoid splatters. Once the mushrooms are golden-brown, remove with a slotted spoon, let drain, and place in the bowl with the minced garlic. Continue until all the mushrooms are fried. Gently toss the fried mushrooms and minced garlic together.
To fry the Thai basil leaves, drop them into the oil all at once, then immediately cover the pot with the lid or splatter screen, with only a slight opening for steam to escape. The splatter will quickly subside in a few seconds. Fry the leaves for another few seconds until the sizzling stops, then remove with a slotted spoon, gently shake off excess oil, and place in the bowl with the fried mushrooms and minced garlic. Sprinkle with salt, ground white pepper, and ground black pepper, and toss to coat evenly.
Apply a generous amount of tartar sauce on both halves of the roll. Pile the fried mushrooms on top, close the sandwich, and serve with finger lime and tabasco sauce.
Sub to my YouTube channel to get notified whenever we have new videos!
Links in this post may be affiliate posts. If you buy an item through an affiliate link, I get a small fee, which helps support this blog!
A sweet, fluffy vanilla pudding, layered with Nilla wafers and banana slices – we’re making Magnolia Bakery’s banana pudding today!
Son and I love traveling. We love going to new places, exploring new cities, trying new foods.
We’re just very bad at it.
There have been numerous occasions where we’ve gone to a new place, I’ve raved about it on instagram, and my friends are all like… Allison… you know we have one of those in LA, right?
Er.
Case in point, when we were in New York last year, wandering around looking for food on our first night there, we came across Magnolia Bakery. Son wanted to try it – he really likes going to bakeries when we travel – so I figured, why not?
The banana pudding seemed popular, so we brought some back to our hotel… and WE WERE OBSESSED.
It’s light and airy and oh so good… and did you know we have a Magnolia Bakery that sells this banana pudding in LA? NOBODY TELLS ME ANYTHING.
But you may be wondering, why, today of all days, are we making this banana pudding?
WELL.
It’s my birthday!!
And I had all these grand plans about making a chocolate layer cake with peanut butter frosting in between the layers…
And then we had a heat wave. And heck no I did not want to bake a layer cake, where I have to bake every layer separately because I have a tiny little oven, and then try to frost it and layer it without it being a total disaster… in the middle of a heat wave.
Nope.
But you know what’s really good when it’s hot outside, and requires neither the oven nor the stovetop? This pudding.
And you know what’s super easy to make and so addictively tasty that me and my entire family were obsessed with it when I first made it earlier this year? This pudding.
So who needs birthday cake, when you’ve got birthday pudding? Let’s cook!
I suggest starting the night before you want to eat it, because there is a good bit of waiting time for this recipe.
First, we make the pudding.
We’ll start with a 14oz can of sweetened condensed milk. It’s sweet, yes, but don’t worry – the final result won’t be cloying.
Mix that with a cup and a half of ice cold water, for about a minute with an electric hand mixer – until it’s completely combined.
Now add the pudding mix. Ideally, you should go with a 3.4oz package of Jell-O’s instant vanilla pudding mix – none of that sugar-free business today! That vanilla pudding flavor is what is really going to make this tasty. Mix that in really really well, for about 2 minutes or so, until it’s completely combined and starting to thicken.
Cover that with plastic wrap, and stick it in the fridge at least 3-4 hours, but ideally overnight.
The next morning!
Whip about 3 cups of heavy cream until you have stiff peaks. This is what will give the pudding a really light, airy consistency.
Once you have stiff peaks, gently fold in the pudding that you already made. Fold it until it’s completely combined – no streaks of pudding or whipped cream left.
Now it’s time to layer!
If you’re serving this at a party, then you’ll want to layer your pudding in a fairly large container, preferably glass so you can see all the pretty layers. However, I also often make smaller portions to give to friends and family, and that works perfectly well too!
Start with layer of Nilla wafers on the bottom. They’ll turn cakey and wonderfully soft as they sit in the pudding.
Then a layer of sliced bananas, for that classic banana pudding flavor.
Top that with a bit of the pudding.
Continue repeating layers until you reach the top of your container, ending with pudding at the top.
If you’d like, you can top this with crumbled Nilla wafers, BUT I would suggest waiting and adding this right before you serve, so they retain a little crunch!
But – it’s not time to eat quite yet. You want all these flavors to meld, and the Nilla wafers to soften. So put your layered pudding back in the fridge for at least 4 hours, but ideally no more than 8!
NOW it’s time to eat the tastiest, most addictive banana pudding you will ever have.
And hey, if you’re brand new to this channel, make sure to hit that sub button, and click the bell to turn on your notifications! We have SO much more tasty food coming up.
And if you want to give me an awesome birthday present where you don’t even have to spend a thing, share this video with your friends, with your family, with anyone you know who is addicted to Magnolia Bakery’s banana pudding. It’s SO good, and it would make me so happy to see this reach even more people.
one 3.4oz package Jell-O instant vanilla pudding mix
3 cups heavy cream
one 12oz box Nabisco Nilla Wafers
4 cups sliced ripe bananas
Cooking Directions
In a small bowl, on the medium speed of an electric mixer, beat together the sweetened condensed milk and water until well combined, about 1 minute. Add the pudding mix and beat well, about 2 minutes more. Cover and refrigerate for 3-4 hours or overnight, before continuing. It is very important to allow the proper amount of time for the pudding mixture to set.
In a large bowl, on the medium speed of an electric mixer, whip the heavy cream until stiff peaks form. Gently fold the pudding mixture into the whipped cream until well blended and no streaks of pudding remain.
To assemble the dessert, select a large, wide bowl (preferably glass) with a 4-5 quart capacity. Arrange one-third of the wafers to cover the bottom of the bowl, overlapping if necessary, then one-third of the bananas and one-third of the pudding. Repeat the layering twice more, garnishing with additional wafers or wafer crumbs on the top layer of the pudding. Cover tightly with plastic wrap and allow to chill in the refrigerator for 4 hours—or up to 8 hours, but no longer!—before serving.
Sub to my YouTube channel to get notified whenever we have new videos!
Links in this post may be affiliate posts. If you buy an item through an affiliate link, I get a small fee, which helps support this blog!
As you saw, we attempted bread last week! And then had a lot of bread to eat, so we just had to eat it Vietnamese breakfast-style at least once.
French bread, fried, egg, maggi sauce. We skipped the coffee this time, but I’d typically (happily) eat this with a nice strong ca phe sua da on the side!
Also made my typical breakfast sandwich – sausage, frico eggs, arugula.
Experimenting with boba.
My balls were too big.
Early birthday cake from my mom! Pistachio cupcakes, and white cake layered with strawberry jam and topped with chocolate ganache.
Something tasty is coming up in a couple of days…
Another spookily delicious thing that’ll be going up later this week!
Lots more mystery tomatoes.
Have a lovely week, everybody! We’re finally past our latest heatwave (and it’s my birthday this week!!!) so I’m looking forward to this week!