Categories
YouTube

WHAT I EAT FOR BREAKFAST EVERY SINGLE DAY | the untaco-est breakfast taco

I’ve shared this before, and I’ll likely share it again. For several years (with occasional breaks), this has been my breakfast nearly every single morning.

It’s very adaptable! Sometimes I’ll sauté red onions in the olive oil before adding the spinach. Sometimes I’ll add beans. If we’re particularly hungry or know it’ll be a while before we eat again, I’ll add extra eggs. And if I happen to have leftover cooked bacon from sushi making or a previous dish, then I’ll crumble it and add it in as well.

Son skips the tortilla, cheese, and fried onions, and just eats his in a bowl topped with tortilla chips. Totally adaptable!

This breakfast is tasty, it’s filling, and most importantly it’s fairly healthy. I love that I can get a couple of servings of veggies in first thing in the morning, so that no matter what else I end up eating each day, at least I got something healthy in. And for me, eggs are a breakfast must – otherwise I’ll end up hungry again pretty quickly, no matter how caloric my breakfast was.

Most of all? I crave this if I go too long eating something else for breakfast. In every way, this is pretty much my perfect breakfast.
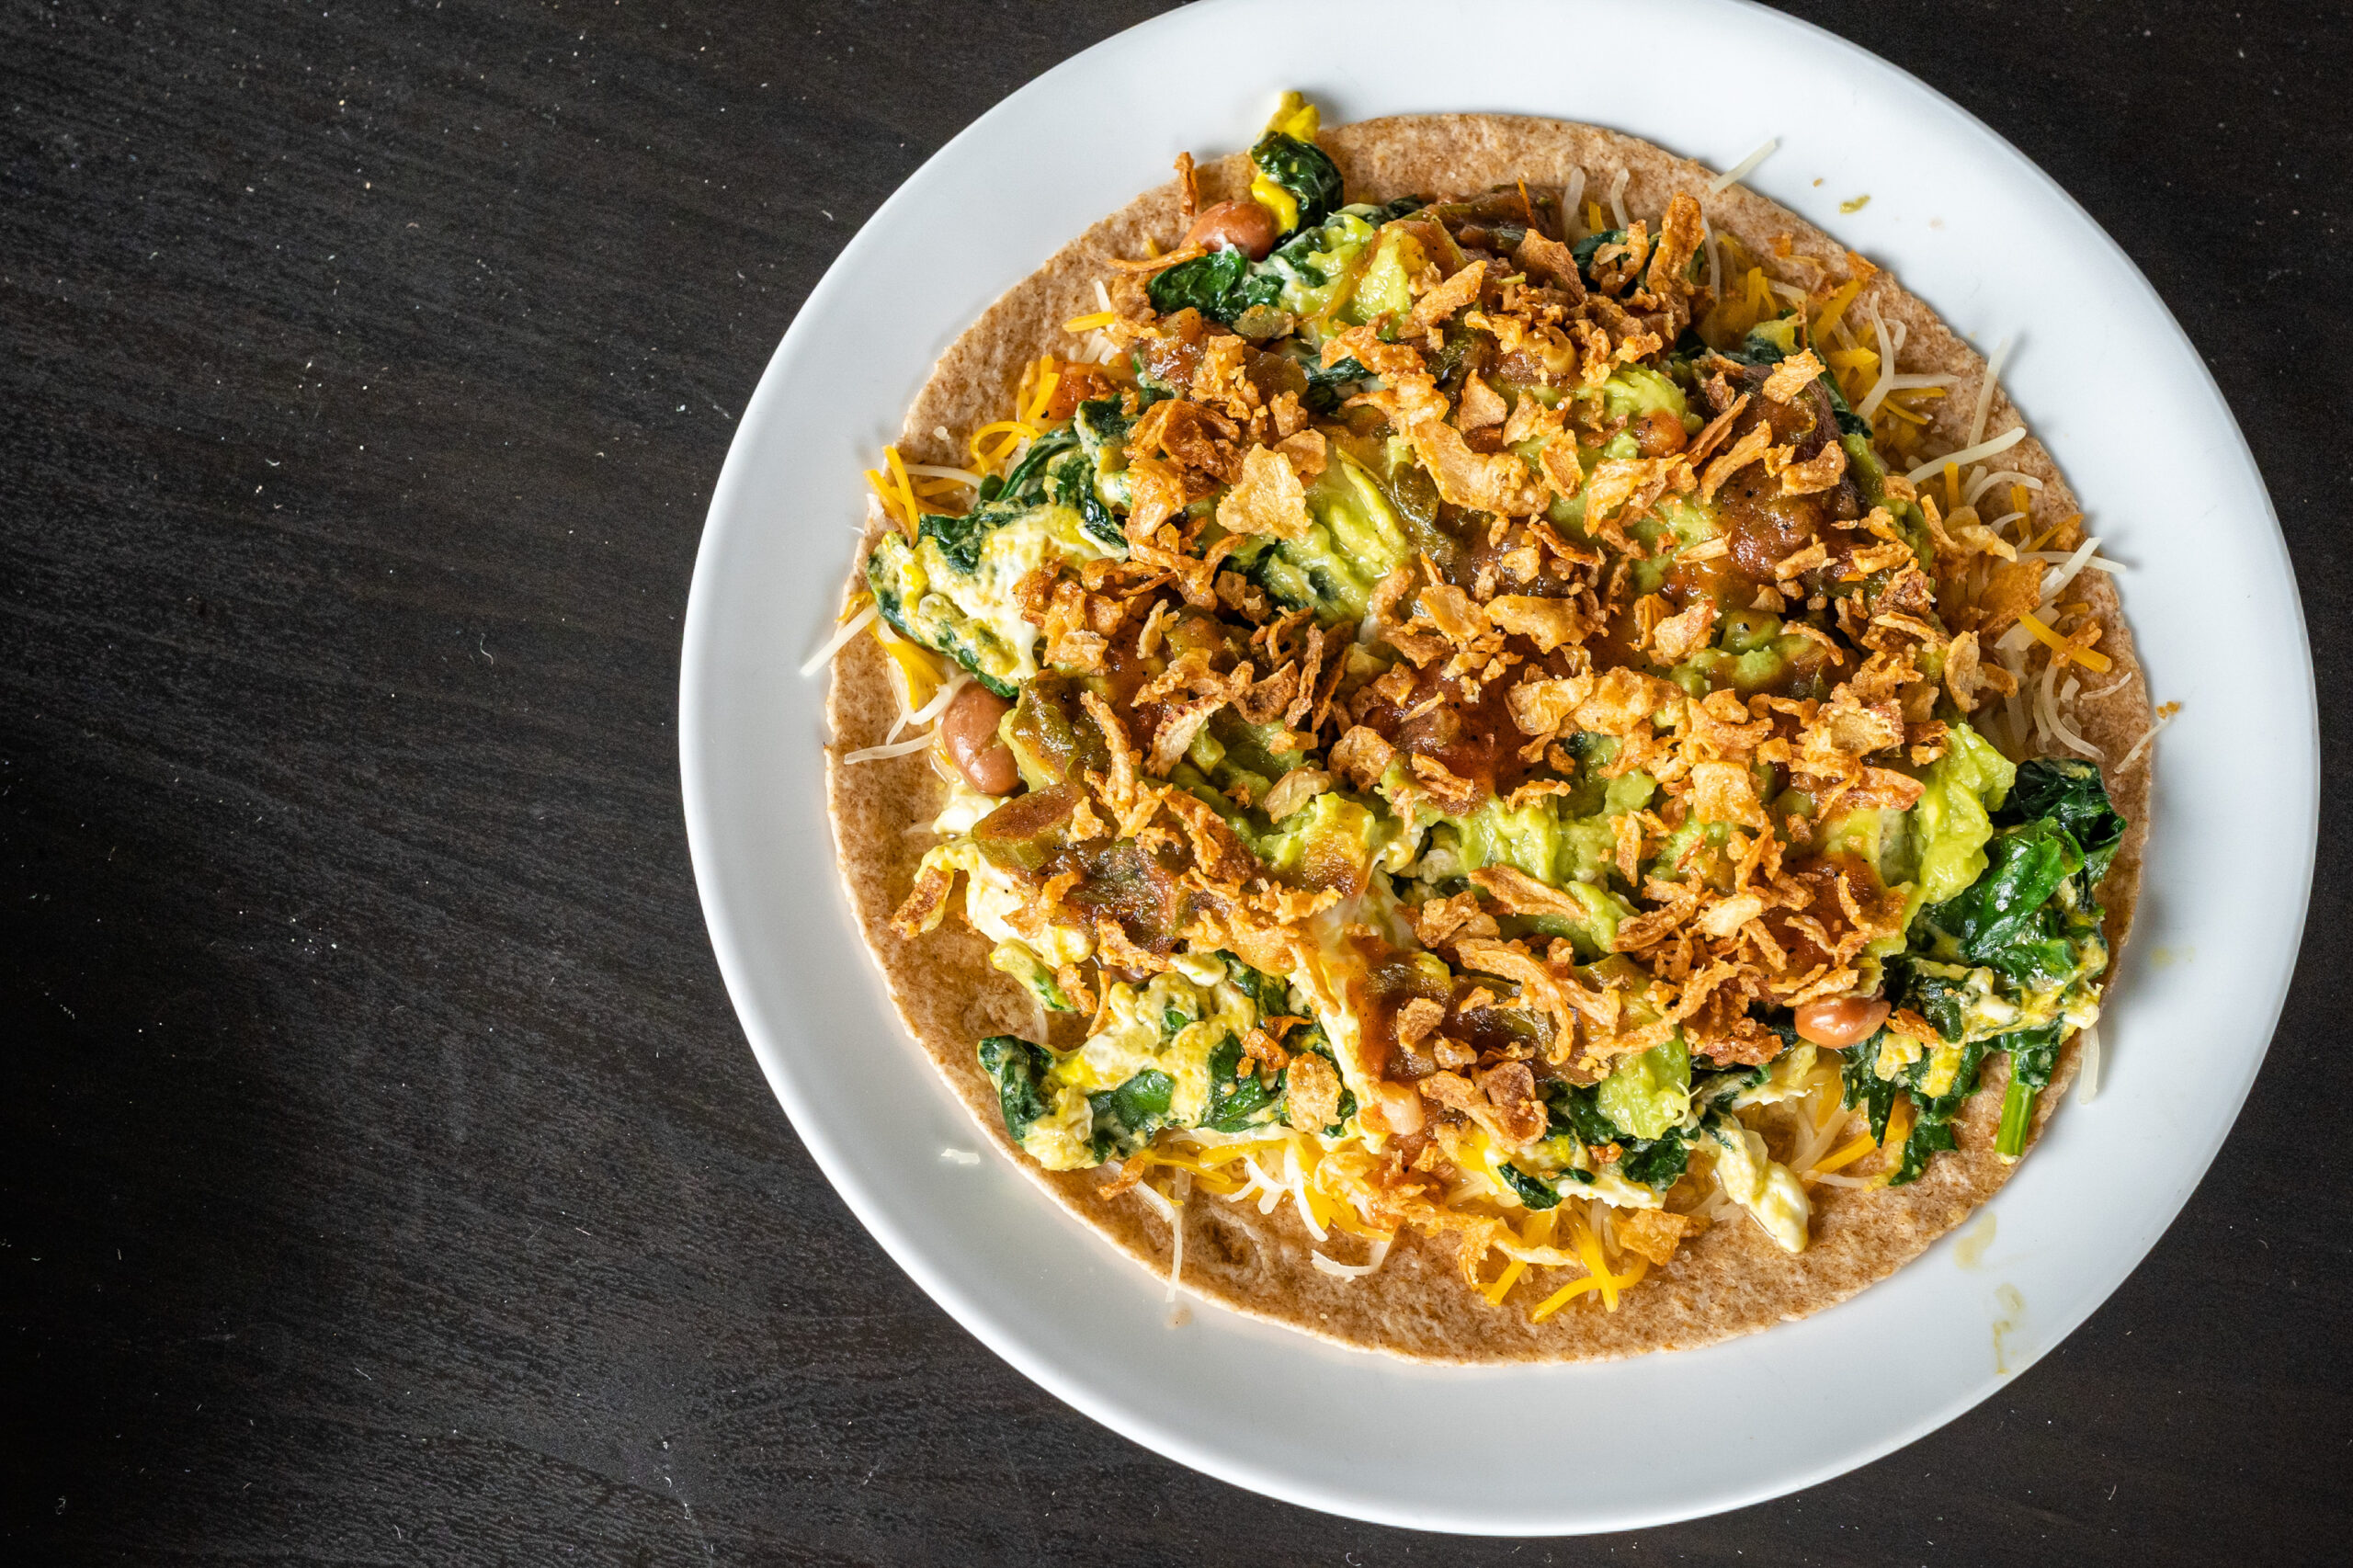
Breakfast “Taco”

serves 2

Ingredients
  • 2 tbsp olive oil
  • 1/2 lb baby spinach
  • 1/2 cup canned pinto beans, rinsed
  • 4 eggs
  • 2 whole wheat tortillas
  • 2 oz shredded mexican cheese
  • guacamole
  • salsa
  • fried shallots or tortilla chips
Cooking Directions
  1. Heat the olive oil in a nonstick pan over medium heat. Add spinach, cover with a lid and let wilt.
  2. Put the tortillas on two separate plates. Warm each tortilla for 15 seconds in the microwave, then top with the shredded cheese.
  3. Once the spinach is completely wilted, remove the lid. Add the pinto beans. Break the eggs into the pan, then scramble, breaking apart the spinach.
  4. When the eggs have set, remove from the heat and split between the tortillas.
  5. Top with guacamole, salsa, and fried shallots or tortilla chips.
  6. Enjoy!

Sub to my YouTube channel and follow me on TikTok or Instagram to get notified whenever we have new videos!

Links in this post may be affiliate posts. If you buy an item through an affiliate link, I get a small fee, which helps support this blog!

Categories
YouTube

Sour Candy Layer Cake

I’ve always loved seeing the cool layer cakes that all the amazing bakers across the internet make. On instagram and tiktok and food blogs, it’s my favorite thing to see some cool cake design, and imagine how that cake might taste.

But I’ve never made one myself.

I was always too intimidated by the idea – plus, we’re not huge dessert people here, and only have a few family members in the area (who will only take a slice or two each?!) so cake baking is definitely not a long-term hobby I can support around here.

I need to make more friends.

Off-handedly, I mentioned a few months ago that I had always wanted to decorate a layer cake, thinking nothing of it.

But then my sister-in-law jokingly suggested that I make a half-birthday cake for my brother.

Of course, I totally missed his half-birthday, but the idea was planted in my brain.

I always love doing something different and interesting with food, so I decided to bake a cake based on his favorite candy – blue raspberry sour candy.

Since I am NOT a cake baker, I used SugarHero’s white cake/buttercream frosting as my base.

I happened to have some lemon curd that I had just made from all the egg yolks leftover from making angel food cake, so that would be my filling.

And blue raspberry lemonade-flavored Kool Aid was going to be my source of flavor.

Top it off with more Kool-Aid powder, fresh raspberries, and sour gummy worms… and my sour candy layer cake was complete!

Crookedness aside (I’m working with none of the right tools here), I was pretty happy with how the ombre cake design and decorative toppings turned out. I was very worried that it was going to end up looking like something a five-year-old made, but ultimately I loved how it turned out!

Taste-wise, it’s not my favorite type of cake (it’s definitely on the heavy/sweet side, and I prefer lighter, less-sweet cakes) – but for what it is, it’s delicious.

The cake + frosting turned out super sweet, and the lemon curd is super tart, but when you eat it all together, it all balances out quite nicely.

And now that I’ve finally baked and decorated a layer cake? Well… I’ll probably never make another (or, only rarely), because that curiosity has been satisfied. What should I try making next?

Blue Raspberry Layer Cake

adapted from SugarHero

Ingredients

Cake

  • 16 oz (2 1/4 cups) granulated sugar
  • 16 oz (4 cups) cake flour
  • 2 tbsp baking powder
  • 1 1/4 tsp salt
  • 6 fl oz egg whites (from about 6 eggs)
  • 1 1/2 cups milk
  • 1 tbsp vanilla extract
  • 9 oz unsalted butter, at room temperature
  • 6 tbsp Blue Raspberry Lemonade Kool-Aid powdered drink mix, divided

Frosting

  • 8 fl oz (1 cup) pasteurized liquid egg whites
  • 32 oz (8 cups) powdered sugar
  • 1 tsp salt
  • 32 oz unsalted butter, at room temperature
  • 2 tbsp vanilla extract
  • 3 tbsp Blue Raspberry Lemonade Kool-Aid powdered drink mix, divided
  • teal gel food coloring

To finish

  • 4-6 cups lemon curd
  • fresh raspberries
  • sour gummy worms
  • Blue Raspberry Lemonade Kool-Aid powdered drink mix
Cooking Directions

Cake

  1. Preheat the oven to 350F. Line one or more 8-inch cake pans with parchment rounds, and spray the parchment and pan sides with nonstick cooking spray.
  2. Combine the sugar, cake flour, baking powder, and salt in the bowl of the stand mixer fitted with a paddle attachment. Mix on low speed for about a minute to combine the dry ingredients.
  3. Lightly whisk together the egg whites, about a quarter of the milk, and the vanilla extract; set aside.
  4. Add the remaining milk and the softened butter to the large mixing bowl and mix on low speed until the dry ingredients are moistened. Turn the mixer to medium speed and mix for a minute and a half.
  5. Add the egg white mixture in three batches, mixing for 20-30 seconds after each addition, until you have a smooth batter. Scrape the bottom and sides of the bowl with a rubber spatula, and give the batter a few more stirs to make sure everything is incorporated. Divide the batter evenly between four bowls (each bowl should contain 15oz of batter).
  6. Leave one bowl plain, and mix the other three bowls of batter with 1, 2, and 3 tablespoons of Kool Aid powder, respectively. Pour batter into separate cake pans – if, like me, you only have one pan, then bake each color one at a time.
  7. Bake the cakes at 350F for 15-20 minutes, until the sides just start pulling away from the pan, and a toothpick inserted into the center comes out clean. If the sides have completely pulled away from the pan, the cakes are probably overbaked.
  8. Let the cakes cool on a wire rack for 10 minutes, then gently turn them out and let them cool completely. Then wrap them with plastic wrap and put them in the freezer for at least 30 minutes, until they are firm but not frozen all the way through. If you are making these in advance, they can stay in the freezer for up to several weeks. Let them partially defrost, until they are firm but not rock-hard, before assembling.

Frosting

  1. Combine the whites, powdered sugar, and salt in the bowl of a large stand mixer fitted with a paddle attachment. Mix everything together on low speed, until the sugar is moistened and no dry patches remain. Turn off the mixer, scrape down the sides and bottom of the bowl with a spatula, then turn the mixer to medium speed. Beat on medium for 5 minutes.
  2. After 5 minutes, turn the mixer to medium-low and start adding the softened room temperature butter, 1-2 tablespoons at a time. Once all of the butter is incorporated, add the vanilla extract and mix it in. Stop the mixer and scrape down the bottom and sides once more. Turn the speed to medium and beat the buttercream for 10 minutes. It can be used right away, or stored in the refrigerator for up to two weeks, or the freezer for up to two months. If you have chilled the frosting, let it come to room temperature COMPLETELY and then beat it for several minutes to smooth it out and restore its texture before using it.
  3. To color the frosting, separate out three 2-cup portions; leave the rest white. Mix one of the 2-cup portions with 1 tablespoon of Kool-Aid powder. Mix the second with 1 tablespoon of Kool-Aid powder and 1 drop of teal gel food coloring. Mix the last portion with 1 tablespoon of Kool-Aid powder and 3 drops of teal gel food coloring.

Assembly

  1. Unwrap the darkest cake and place it on a cake cardboard if you have it, or parchment paper on a flat dish or board if you don’t. (Don’t use a plate with a curved edge, as that will make it difficult to both frost and serve.) If you have a cake turntable, put the cardboard/dish on top of that.
  2. Fill a piping bag with the darkest color frosting, and pipe a thick line of frosting on top of the outer edge of the cake.
  3. Spoon lemon curd inside the line of frosting, spreading it to the edges of the frosting. Make sure you don’t add so much that it will overflow when you add the next layer of cake on top.
  4. Continue this process with the next two lightest colors of cake/frosting, then top the stack with the uncolored layer of cake.
  5. Cover the top and sides of the cake with a very thin layer of white frosting—this is the crumb coat, which locks crumbs into the frosting and also provides some stability to the cake. If you can, refrigerate the cake for 30-45 minutes, until the crumb coat is set and the cake feels firm and stable. I skipped the refrigeration and it turned out okay, if a little unsteady.
  6. Pipe a super thick layer of the darkest icing around the bottom of the cake, up to where the second cake layer starts. Repeat with the second darkest color of icing in the middle, and the lightest colored frosting at the top.
  7. Using a bench scraper, apply pressure while turning the cake to smooth out the icing on the sides, and create an ombre pattern.
  8. If you’d like, you can use the leftover frosting from your bench scraper, or pipe more of each color frosting on the top, to create a reverse ombre ring – darkest in the middle, lightest around the outside.
  9. Once your frosting is smooth, it’s time to decorate. Using a small sifter, sprinkle more Kool-Aid powder all over the top and sides of the cake, to mimic the sour sugar on the outside of sour candies.
  10. Arrange fresh raspberries and sour worms on the top and side of the cake, and then sprinkle with more Kool-Aid powder.
  11. The cake can be enjoyed immediately, but it cuts far better if you chill it first, so the frosting and lemon curd sets. If chilled, bring to room temperature before eating. Cake will keep, well-wrapped, in the refrigerator for several days.
  12. Enjoy!

Sub to my YouTube channel and follow me on TikTok or Instagram to get notified whenever we have new videos!

Links in this post may be affiliate posts. If you buy an item through an affiliate link, I get a small fee, which helps support this blog!

Categories
YouTube

Vegan Blueberry Crisp

If the above video doesn’t load for you, click here to see it on TikTok!

I am a clumsy human being.

I am VERY injury-prone.

Which, oddly enough, does NOT work great with trying to be a dancer.

The first time I ever sprained my ankle, I was at a park with my girl scout troop. I don’t remember why we were there, but we were getting ready to leave, and all of us kids were running up and down the hill.

And somehow, I stepped wrong, sprained my ankle, and went rolling down the hill.

My mom is one of those moms who always had one of those little Igloo coolers in the car, usually filled with water bottles and snacks and at least one ice pack.

My ankle soon became intimately acquainted with that ice pack.

Over the years the car emergency kit grew to include bobby pins, hair nets, and the kind of instant ice packs where you stomp them to break the inner pouch and they get cold instantly.

Between me and my also-clumsy siblings? We got A LOT of use out of those.

I’m always on the lookout for desserts that are SUPER fruit-heavy, especially involving blueberries.

I was… oddly uncertain about whether this would be good or not, and it actually sat in the fridge for a bit before we actually ate it (because I made the mistake of making it right around Mother’s Day and ended up having way too many desserts in the house.)

But I was happily proven wrong, because this was really freaking tasty. And on top of that, it uses ingredients that I usually have on hand, AND it was easy! A total winner.

Vegan Blueberry Crisp

recipe from Martha Stewart

Ingredients

Topping

  • 1 1/2 cups old-fashioned rolled oats, divided
  • 1/2 cup toasted almonds
  • 1/2 cup sugar
  • 1/4 tsp kosher salt
  • 1/2 cup extra-virgin coconut oil, room temperature

Filling

  • 3/4 cup sugar
  • 1/4 cup cornstarch
  • 1/2 tsp kosher salt
  • 2 pounds blueberries (6 cups)
  • 1 tbsp fresh lemon juice
Cooking Directions
  1. Preheat oven to 375 degrees. Pulse 1 cup oats and almonds in a food processor until coarsely ground. Transfer to a medium bowl and add remaining 1/2 cup oats, sugar, salt, and coconut oil. Mix with your hands or a fork until evenly moistened and large clumps form.
  2. In a large bowl, whisk together sugar, cornstarch, and salt. Add blueberries and lemon juice; stir to combine. Transfer to an 8-inch square baking dish. Sprinkle evenly with topping. Cover with parchment-lined foil and bake 30 minutes. Remove foil and continue baking until center is bubbling and topping is golden brown, about 45 minutes more. Let cool at least 1 hour before serving.

Sub to my YouTube channel and follow me on TikTok or Instagram to get notified whenever we have new videos!

Links in this post may be affiliate posts. If you buy an item through an affiliate link, I get a small fee, which helps support this blog!

Categories
Other Sushi Randomness Sushi YouTube

Sushi Bake

Somehow, throughout all my years as a sushi blogger… I’ve never tried a sushi bake?

THAT CHANGES TODAY.

TBH it never sounded super appetizing to me BUT I’m always down for giving things a chance and I had a feeling it was going to be tastier than it looked (to me)!

I was right.

It’s SUPER easy to make (way easier than sushi), totally appropriate for a weeknight meal (as long as you set that rice to be ready ahead of time), and very tasty!

This has all the creamy, sushi goodness of every hot American-style sushi roll you’ve ever had… it reminds me a lot of sushi dynamite or deep-fried california rolls.

I highly recommend it!

Sushi Bake

recipe very slightly adapted from I Am A Food Blog

Ingredients
  • 1 1/2 cups (2 Zojirushi cups) short grain rice, cooked
  • 1/4 cup rice vinegar
  • 1/2 tbsp sugar
  • 1 tsp salt
  • 8 oz imitation crab, shredded and chopped
  • 1/2 cup cream cheese, room temp
  • 1/2 cup kewpie mayo
  • 1/4 cup furikake nori or sesame seeds https://youtu.be/B6AORDkzEtU
  • 1/2 cucumber, sliced
  • 1 avocado, sliced
  • Korean seaweed snacks
Cooking Directions
  1. Heat the oven to 425°F. Combine the rice vinegar, sugar, and salt in a small sauce pan and warm over low heat until the sugar dissolves. Using a slicing motion, mix into the rice. Let the rice cool slightly.
  2. In a bowl, mix the shredded crab with the cream cheese and mayo until smooth. Set aside.
  3. Spread the sushi rice into an oven safe baking dish and top with 1/2 of the furikake.
  4. Top with the cream cheese mayo crab mix. Sprinkle on the remaining furikake.
  5. Bake for 10-15 minutes or until the top just begins to brown and bubble and the casserole is warmed through.
  6. Enjoy warm with seaweed, sliced cucumbers, and sliced avocados.

Sub to my YouTube channel and follow me on TikTok or Instagram to get notified whenever we have new videos!

Links in this post may be affiliate posts. If you buy an item through an affiliate link, I get a small fee, which helps support this blog!

Categories
TikTok YouTube

Deviled Ramen Eggs

@sushidaytv

turning ramen eggs into deviled eggs? A GENIUS IDEA IF I DO SAY SO MYSELF ? #BestSeatInTheHouse #foodie #cookingtiktok #foodOnTikTok #ramen

? Taste It – TELL YOUR STORY music by Ikson™

If the above video doesn’t load for you, click here to see it on TikTok!

I’m half-Japanese. I grew up eating a ton of Top Ramen and Cup Noodles, but I never had real ramen until I was an adult.

It was on our first big trip together.

I had just graduated from college, and Son and I had been together for a little over three years by then. And we decided, since I finally had time to travel, that we wanted to go to Hawaii.

In retrospect you could say this was the most honeymoon-like trip we’ve ever taken, since we never actually took a honeymoon after we finally got married (speaking of which, today’s our four-year wedding anniversary!)

We had no idea how to travel, and we were only just starting to get into food at the time, since we had been poor college students for most of our relationship up until then.

But we dutifully made an entire list of restaurants we wanted to try.

We ate well that trip – macadamia nut pancakes, lobster sashimi, poke, curry, mochi ice cream… and, of course, ramen.

It may have been our first ramen, but it definitely was not our last.

I got the idea to do these deviled ramen eggs after I made some ajitsuke tamago (ramen eggs) and had some leftovers sitting in the fridge.

They are RICH so having the beni shoga (pickled ginger) and green onions to cut the heaviness is a necessity.

But they are oh so good. These would make a fantastic party appetizer!

Deviled Ramen Eggs

Ingredients
  • 1 ajitsuke tamago (ramen egg)
  • 1/4 tsp takoyaki or okonomi sauce
  • 1/2 tsp kewpie mayo
  • fried onions or tempura bits
  • beni shoga
  • green onions
  • bonito flakes
  • aonori
Cooking Directions
  1. Slice the ramen egg in half, place yolks in a bowl. Add takoyaki sauce and kewpie mayo, mash until smooth. Spoon or pipe back into the egg whites.
  2. Garnish with fried onions, beni shoga, green onions, bonito flakes, and aonori.
  3. Enjoy!

Sub to my YouTube channel and follow me on TikTok or Instagram to get notified whenever we have new videos!

Links in this post may be affiliate posts. If you buy an item through an affiliate link, I get a small fee, which helps support this blog!

Categories
YouTube

Soot Sprite Mochi

This is my (extremely) last-minute submission to The Practical Escapist’s #GhibliMay event: Soot Sprite Mochi!

Plain daifuku mochi, filled with a black sesame cream cheese filling, and then rolled in ground black sesame seeds to look like soot sprites. I may be baised, but I think they ended up super cute.

Despite my hesitations (I haven’t made much mochi, and it’s always turned out a little questionable), I think these turned out wonderfully! The mochi was perfectly soft, the ground black sesame on the outside added a tasty nuttiness, and the tanginess of the cream cheese filling was unusual compared to the normal sweet bean fillings, but quite tasty.

Check out the rest of the #GhibliMay submissions on The Practical Escapist’s channels: YouTube and Twitch!

Steamed White Daifuku Mochi

from Mochi Magic

Ingredients
  • 3 cups mochiko
  • 1 1/2 cups sugar
  • 1 tbsp flavoring
  • 3 cups water
  • 2 cups cornstarch or potato starch, for dusting
  • 1 cup filling of choice
Cooking Directions
  1. Add enough water to the steamer base to fill the pot halfway (make sure the water doesn’t touch the steaming basket). Bring the water to a boil over medium-high heat.
  2. While the water heats, mix together the mochiko, sugar, and flavoring with a whisk or spatula until incorporated, about 1 minute. Add the water and mix until the water is fully incorporated. You shouldn’t see any lumps, and the mixture should look smooth, like pancake batter.
  3. Thoroughly wet a 3′ square cotton cloth with water, then wring it out. Drape the cloth over the steaming basket of the steamer. Pour the mochi mixture on top of the cloth. Put the lid on the steamer and rest the excess cloth on top of the steamer lid so it doesn’t hang down the side of the pot.
  4. Steam over medium-high heat until the mochi is solid, thick, uniformly translucent, and easy to peel from the cloth, 25 to 40 minutes. Replenish the steamer base with additional hot water as needed. To test if the mochi is done, mix it with a spatula. If it is all the same color and texture, it is done.
  5. Rub a large cutting board with 1/2 cup of the cornstarch, focusing on the middle section of the board where the cooked mochi dough will be placed. When the mochi is done steaming, lift the cloth from the steamer by the corners and carry it to the cutting board. Peel the mochi off the cloth and transfer it to the center of the cutting board. Peel the mochi off the cloth and transfer it to the center of the cutting board. The mochi should peel off easily. If not, use a spatula to get the mochi off the cloth and onto the board. Let cool for 5 minutes.
  6. Coat your hands with plenty of cornstarch. If the mochi is still hot, you can slip on gloves before dusting your hands with the starch. Sprinkle a healthy amount of cornstarch over the mochi mass. Carefully slide your fingers under one side of the mochi and roll it over on the cutting board to coat the mass entirely in starch.
  7. Form the mochi into a log 4 to 5 inches wide. Using your non-dominant hand, grab a golf ball-sized piece of mochi and pinch the piece off from the mass by curling your index finger and your thumb together. Ad the same time, pull the pinched mochi piece away from the mass with your dominant hand.
  8. Cover this piece with starch and lay it on the board. Repeat until the whole mound has been used.
  9. To fill: Slightly flatten a mochi piece into a circle about 3/4″ thick.
  10. Place 1 rounded teaspoon of the filling in the center of the mochi.
  11. Cover your hands with cornstarch. Starting at 3 and 9 o’clock on the circle, pinch the edges of the mochi together over the filling, pinching tightly so they stick together.
  12. Pinch together the opposing sides, 12 and 6 o’clock, to form a loose bundle.
  13. Finally, pinch all the corners into the center of the mochi, making sure to pinch hard enough to seal.
  14. Flip the mochi upside down and brush off excess starch. Repeat with the remaining mochi pieces.
  15. To coat: Pour the coating into a medium bowl, and fill a separate medium bowl with water. Submerge one piece of filled mochi into the water, moistening all sides, then roll the mochi in the coating until coated. Repeat with the remaining mochi for a beautiful look.
  16. To store: Cover a plate in cornstarch if you are not using cupcake papers. Round each mochi with your hands a few times, then set them on the cornstarch-covered plate or in cupcake papers. Enjoy immediately or store at room temperature for up to 1 day or in an airtight container in the freezer for up to 1 month.

Black Sesame Cream Cheese Filling

from Mochi Magic

Ingredients
  • 1 8oz package full-fat cream cheese, room temp
  • 2 1/2 tbsp ground black sesame seeds
  • 1/2 cup confectioners’ sugar
  • 1 tbsp honey
  • 1 tsp kinako
Cooking Directions
  1. Thoroughly combine all ingredients, until the mixture has an even consistency.
  2. Lay a piece of parchment paper on a plate or baking sheet. Using a spoon and wet hands, make 12 balls that are each 1 1/2″ wide. Refrigerate for 1 hour, or overnight. Remove from refrigerator right before use.

Sub to my YouTube channel and follow me on TikTok or Instagram to get notified whenever we have new videos!

Links in this post may be affiliate posts. If you buy an item through an affiliate link, I get a small fee, which helps support this blog!

Categories
YouTube

Okonomiyaki Fried Rice

Rice, rice, baby!

I have a thing for using okonomiyaki flavors in random places. I’ve done it in maki sushi, inari sushi, deviled eggs… you just can never go wrong!

I grew up eating bacon fried rice for special occasions – it’s still a New Year’s morning tradition in my family. Add in a ton of cabbage, eggs, and rice, and top it with allllll the delicious okonomiyaki toppings, and you’ve got some excellent fried rice!

Okonomiyaki Fried Rice

Ingredients
  • 1 lb bacon, diced
  • 1 head cabbage (red or green is fine), thinly sliced
  • 4 cups day-old short-grain rice, refrigerated overnight
  • 1/2 cup dashi, optional
  • 4 eggs
  • okonomi or takoyaki sauce
  • kewpie mayo
  • aonori
  • bonito flakes
  • benishoga
Cooking Directions
  1. Fry bacon in a large pan or wok, until starting to crisp.
  2. Add in cabbage, and cook until cabbage caramelizes.
  3. Add rice, and dashi, if using. Cook until rice is broken up and thoroughly incorporated with the other ingredients.
  4. Push rice to the side and add in eggs. Cook eggs, stirring, until they begin to scramble, then slowly stir them into the fried rice. Remove from heat.
  5. For each serving, top the rice with okonomi sauce, kewpie mayo, aonori, bonito flakes, and benishoga.
  6. Enjoy!

Sub to my YouTube channel and follow me on TikTok or Instagram to get notified whenever we have new videos!

Links in this post may be affiliate posts. If you buy an item through an affiliate link, I get a small fee, which helps support this blog!

Categories
TikTok

Apple Crumble

@sushidaytv

I miss him a whole bunch, he would have LOVED this apple crumble ? #foodOnTikTok #foodie #foodTikTok #dessert

? Pieces (Solo Piano Version) – Danilo Stankovic

If the above video doesn’t load for you, click here to see it on TikTok!

I’ve always found myself to be really lucky that none of the important men in my life have ever been particularly weirded out by anything to do with that time of the month.

I was in high school, freshman year, when puberty hit. And it hit hard.

I was in math class, and started to feel really unwell. I took out my retainer, put it in its case, and then walked over to my teacher’s desk and asked if I could go to the nurse’s office.

I didn’t even wait for him to write a note – the moment he said yes, I ran out of the room.

Halfway to the nurse’s office, I ended up barfing into a trash can.

A security guard – the strict one everyone was scared of – saw me, and I was afraid I was going to be in trouble, but she was just like, oh you poor baby, and walked me the rest of the way to the nurse.

I ended up curled in the fetal position on the floor of the bathroom of the nurse’s office, until my dad came and picked me up.

And he just took it all in stride – we’ve got Sprite, we’ve got Advil, we’ve got heat pads, he even, a few times, took a rolling pin to my quads or massaged my lower back and belly when I had debilitating cramps.

I’m a huge fan of this apple crisp recipe.

It’s easy to make, and OH SO good.

I definitely recommend using a mix of apple types, if you can. We only had Fuji apples in the house, so it turned out just a tad sweeter than we would have preferred.

The original recipe used bourbon in place of the lemon juice, but I don’t tend to keep any on hand, so I just used a commenter’s suggestion of lemon juice and that worked perfectly fine (I’m sure it would be great with the bourbon though!)

Some people in the comments were questioning leaving the skin on, but it softened up and worked wonderfully for me – plus it’s way easier to not have to peel the apples ahead of time.

The original recipe was a little heavy on the nutmeg, so I reduced it in my version.

But I absolutely, 10/10 would make this again. And again, and again, and again.

Apple Crumble

very slightly adapted from Serious Eats

Ingredients
  • 100g all-purpose flour
  • 165g turbinado sugar
  • 1 tbsp freshly grated lemon zest
  • 1 tsp freshly grated nutmeg
  • 1 tsp kosher salt
  • 100g toasted pecans
  • 10 tbsp unsalted butter, cut into small cubes
  • 4 apples, skin on, cored and diced
  • 3 tbsp sugar
  • 1 tbsp cornstarch
  • 1/2 tsp kosher salt
  • 2 tbsp lemon juice
Cooking Directions
  1. Preheat oven to 375°F.
  2. In a food processor, pulse flour, raw sugar, lemon zest, nutmeg, and salt until well combined.
  3. Add pecans and pulse just until pecans start to break apart, 2 to 3 pulses. Some whole pecans should still be visible.
  4. Add butter and pulse until mixture resembles a coarse meal, with pea-sized chunks. Transfer to a bowl and chill in refrigerator or freezer until ready to bake.
  5. Toss apples, sugar, cornstarch, salt, and whiskey in a large mixing bowl until evenly combined. Transfer to a 2-quart (8×8″) baking dish and cover with crisp topping, spreading it into an even layer across the dish. Do not pack topping down with your hands. Bake until topping is darker in color, sandy, dry, and firm to the touch, about 45 minutes. Let crisp cool for at least 15 minutes before serving. Serve with ice cream.

Sub to my YouTube channel and follow me on TikTok or Instagram to get notified whenever we have new videos!

Links in this post may be affiliate posts. If you buy an item through an affiliate link, I get a small fee, which helps support this blog!

Categories
TikTok

Lava Cakes with Raspberry Sauce

If the above video doesn’t load for you, click here to see it on TikTok!

Someone on TikTok recently asked, “When is your birthday and what’s your favorite memory of one of your birthdays?””

I was never allowed to have the kind of birthday party my friends had, growing up. My parents never let me have a sleepover, I never had a jump house, never played laser tag, never went to Chuck-E-Cheese…

But none of that mattered, because I had the BEST birthday parties.

And I’m not just saying that – I had so many friends tell me YEARS after the fact that I had the coolest birthday parties… which is saying a lot, because by no stretch of the imagination was I ever a cool kid.

Every year for my birthday party, my dad would spend the days leading up to it putting together an epic treasure hunt.

It was nothing fancy – my parents would buy knicknacks – erasers, stickers, that sort of thing – as the prizes, but it was so much fun.

They’d split us into two teams. Each team would get a puzzle or riddle to start, and once we solved it, the answer would tell us where around the house or backyard to find the next clue. Every clue would have a little container of prizes with it – one for each team – so we’d be collecting little goodies as we went along. And – importantly – our clues were in different orders so we couldn’t just follow whichever team solved the clue first.

I don’t know if there was actually any extra prize for finishing first aside from bragging rights, but we always raced to solve all the clues as fast as we could. Even when I was on the losing team, everyone always had so much fun with it.

As for when my birthday is, yesterday was actually my half-birthday… so I’ll let you do the math.

My mom requests these lava cakes with raspberry sauce for her birthday or Mother’s Day every year, so these are a family favorite!

They’re SUPER easy to make – these days, I make them ahead, and she bakes them herself so she can have some hot, tasty lava cakes whenever she wants.

Lava Cakes

from Martha’s Baking Addiction

Ingredients
  • 4 oz (115g) dark chocolate, coarsely chopped
  • 1/2 cup unsalted butter
  • 2 large eggs + 2 large egg yolks
  • 1 tsp vanilla extract
  • 1 cup powdered sugar
  • 1/2 cup all-purpose flour
Cooking Directions
  1. Preheat the oven to 425F. Grease four 4oz ramekins, and place them on a baking tray.
  2. Place the chocolate and butter in a large microwave-safe bowl and heat in 20 second intervals, stirring after each one, until melted and smooth.
  3. Add the eggs, egg yolks, and vanilla, and whisk until combined. Add the powdered sugar and flour, and whisk until smooth and combined.
  4. Divide the mixture between the prepared ramekins. If you’d like to prepare ahead of time, you can cover these with saran wrap and refrigerate until ready to bake.
  5. When ready to serve, remove plastic wrap and bake at 425F for 12-15 minutes, or until the sides of the cakes are firm and the centers are still soft and gooey.
  6. Carefully run a knife around the edges of each cake, then turn them out onto serving plates. Serve warm with a scoop of ice cream, raspberry sauce, and fresh raspberries.

Raspberry Sauce

from Ginger with Spice

Ingredients
  • 500g (18 oz) raspberries
  • 30g sugar
Cooking Directions
  1. Place raspberries and sugar in a saucepan, over medium high heat. Stir occasionally, mashing, until it comes to a simmer.
  2. Continue cooking, stirring occasionally, until the sauce reaches your desired thickness, then remove from heat. If desired, strain to remove the seeds.

Sub to my YouTube channel and follow me on TikTok or Instagram to get notified whenever we have new videos!

Links in this post may be affiliate posts. If you buy an item through an affiliate link, I get a small fee, which helps support this blog!