Categories
YouTube

Cucumber Kimchi

I’ve mentioned before that I’m a dancer. And if you’re a dancer, you’ll get this, but if not, you may not realize… but dancers, every last one of us, are really freaking clumsy.

We can be super graceful or hard-hitting on stage, but the moment we stop performing, we turn into baby giraffes.

I went to the orthopedist a while back because I was having ankle issues, and he did all his scans and such, and came back and was like, “Allison? If you ever want to dance professionally, you’re gonna have to get surgery. There are supposed to be two ligaments here. You only have one.”

Like, I’ve sprained my ankle so many times that one of my ligaments straight up quit. It snapped, “I’m outta here,” and full on ghosted me.

And, to be fair, I don’t blame it – everybody deserves better than the shit I put my poor ankle through.

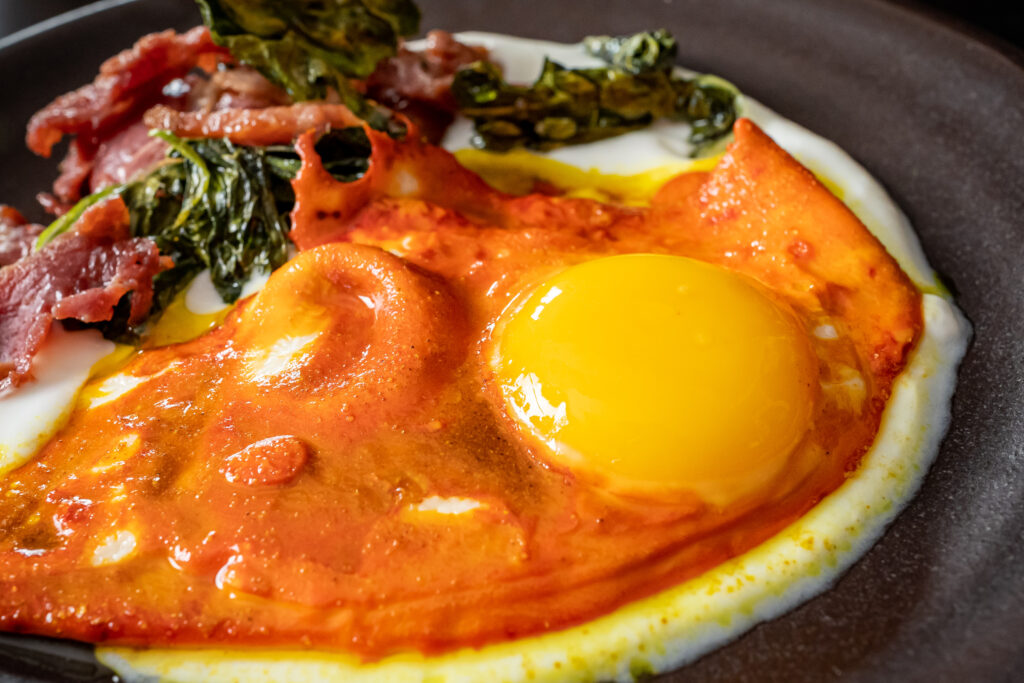
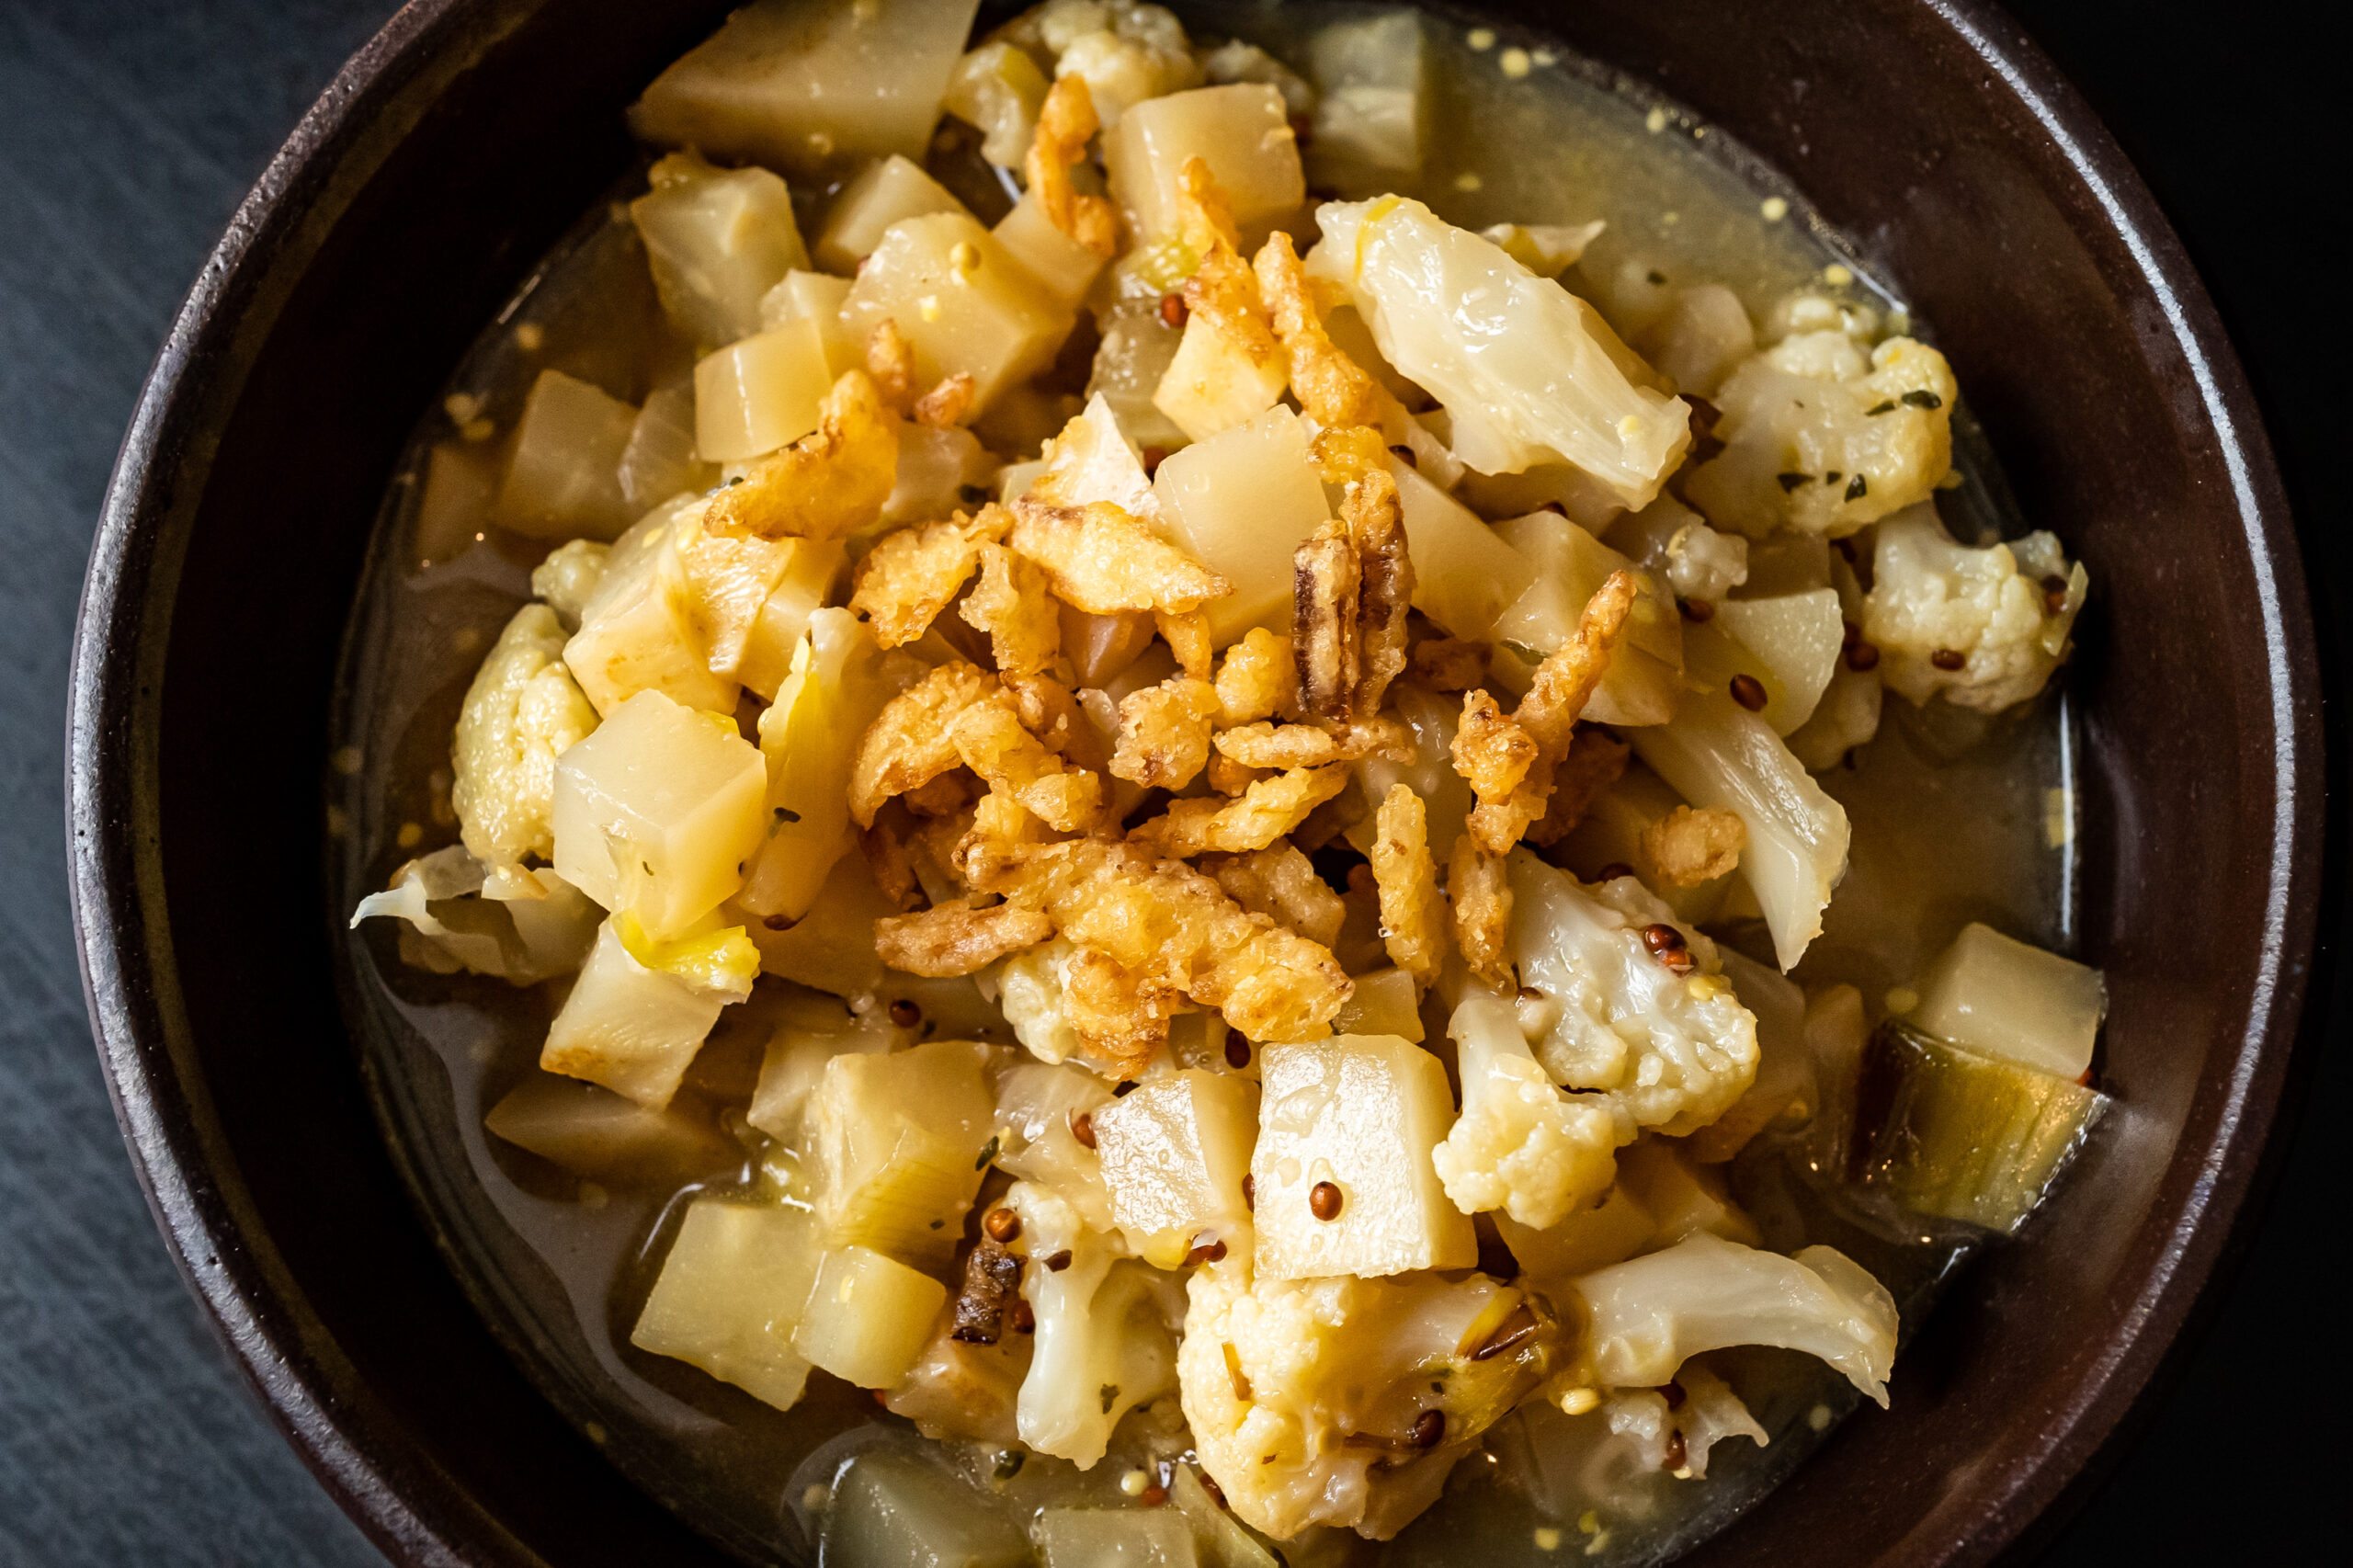
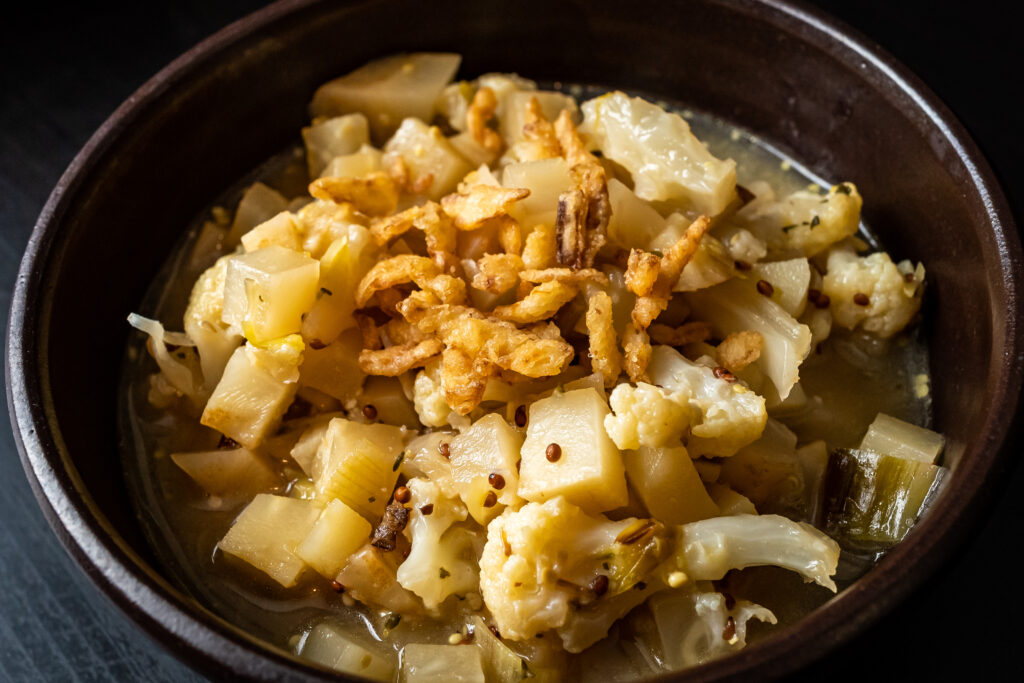
I’ve made this cucumber kimchi a number of times, and it continues to be a favorite. It’s a crunchy, refreshing counterpart to grilled meats and other banchan!

Just make sure you eat it within a few days of making – it WILL start to get watery, and definitely doesn’t last as long as other kimchis.
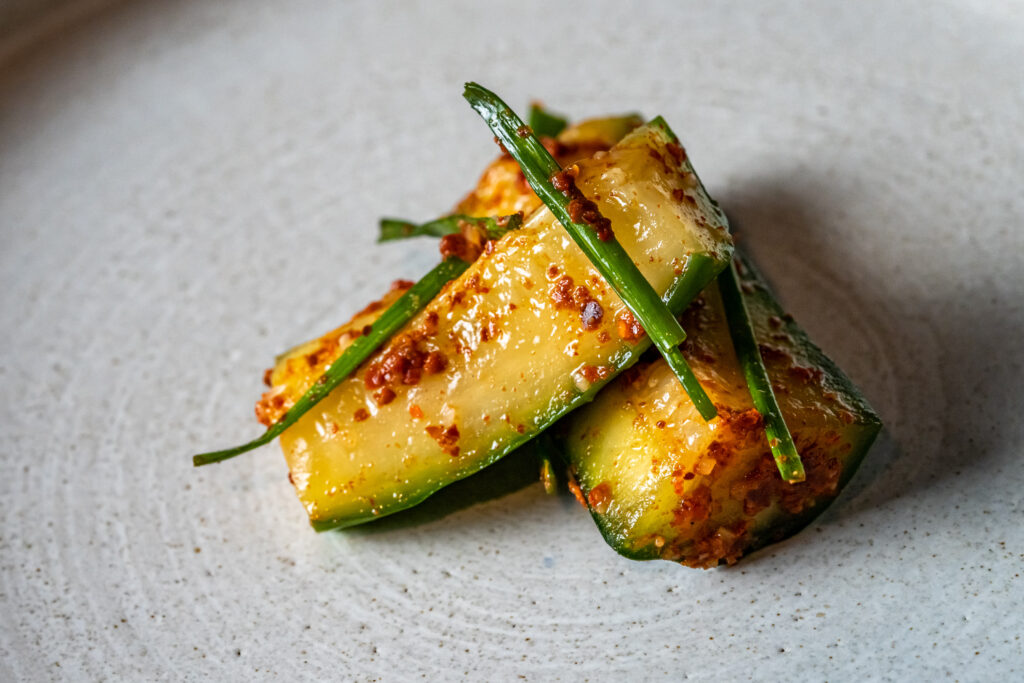
Cucumber Kimchi

adapted from My Korean Kitchen

Ingredients
  • 1 lb (about 3) cucumbers, rinsed
  • 1 tbsp kosher salt
  • 20 g (1 bundle) chives, cut into 2″ pieces

Sauce

Cooking Directions
  1. Cut off both ends of the cucumbers and discard. Divide the cucumbers into 3 pieces, then quarter each piece lengthwise. Put the cucumber into a large bowl then gently mix in the salt so the cucumbers are evenly coated. Let rest for 20 minutes, then rinse and drain well.
  2. Combine all of the sauce ingredients, then gently mix into the cucumbers. Gently mix in the chives. Transfer into a glass container and cover.
  3. If desired, let sit at room temperature for about 12 to 18 hours before refrigerating. Serve chilled.

Sub to my YouTube channel and follow me on TikTok or Instagram to get notified whenever we have new videos!

Links in this post may be affiliate posts. If you buy an item through an affiliate link, I get a small fee, which helps support this blog!

Categories
YouTube

Bacon Crunchy Shrimp Roll

Way back in 2006, a year after Son and I started dating, he had ?an idea ?

“You should start a food blog,” he said, “we’ll make so much money!”

This was way back before everybody and their mother were blogging, and food blogs were a new exciting thing nobody was doing yet.

“And, because every blog needs a niche, and because you’re half Japanese, it should be a blog about ?sushi?!”

… never mind that I had never made sushi in my LIFE.

So we started a blog, filled with sushi recipes – I was the recipe creator and sushi maker, and he took care of the photography.

We called it Sushi Day because – obviously, it was about sushi, and my last name is Day, plus it nicely lends itself to our motto that “Every day is a Sushi Day!”

And that is how I started making food on the internet.

All that being said, don’t think we found any success in that. I was a truly terrible food blogger, and as for money? Yeah, we didn’t make jack shit.

Bacon Crunchy Shrimp Roll

Ingredients
  • 1 sheet nori
  • 1/2 cup sumeshi
  • 2 tempura shrimp, cooked according to directions on the package
  • 1-2 slices of bacon, cooked and crumbled
  • 1/4 avocado, sliced
  • 1 green onion stalk
  • kewpie mayonnaise
  • sriracha, to taste, optional
Cooking Directions
  1. Cook sushi rice.
  2. Cook bacon and tempura shrimp, slice avocado
  3. Mix sriracha into kewpie mayo, to taste. A little goes a long way, so start with just a few drops.
  4. With a bamboo rolling mat, roll the sushi, using the tempura shrimp, bacon, avocado, green onion, and spicy mayonnaise as your fillings.
  5. Slice the sushi, and enjoy!

Sub to my YouTube channel and follow me on TikTok or Instagram to get notified whenever we have new videos!

Links in this post may be affiliate posts. If you buy an item through an affiliate link, I get a small fee, which helps support this blog!

Categories
TikTok

Kuromame (simmered black soybeans)

I know this is a little after the fact, but what are your New Year’s traditions? I love hearing about all the different things that other cultures and families do to celebrate, or the lucky things that you’re supposed to do or eat.

I’m half Japanese, so my family always does a huge sushi feast for New Year’s. But in addition to sushi, there are a few lucky things we do every year.

We always have to have mochi, which are Japanese rice cakes, as the first thing we eat in the new year. A lot of the time we’ll have that in ozoni, which is a light soup.

We also have to have kuromame, which are these simmered black soybeans – eat your bean for good health in the new year!

Growing up, we always bought a little can of kuromame, and nobody really liked them. But in the last decade, I started making this recipe, which originally came from La Fuji Mama – you should go check her TikTok out if you’re at all interested in Japanese food or culture!

These days, everybody LOVES the kuromame – I have to make a big batch every year!

Kuromame

slightly adapted from La Fuji Mama

Ingredients
  • 10.5 ounces kuromame (dried black soybeans)
  • 11 cups water
  • 1 1/2 cups granulated sugar
  • 2 1/2 tsp shoyu
  • 1 tsp baking soda
Cooking Directions
  1. Thoroughly rinse the beans in cool water, then drain and set aside.
  2. Bring the water to a boil in a large pot. Add the sugar, shoyu, and baking soda and let simmer for 3 minutes, then remove from the heat.
  3. Add the rinsed beans and the liquid to the pot of a slow cooker, cover, and let the beans soak 8 hours or overnight.
  4. Turn the slow cooker to LOW and cook for about 8 hours or overnight.  The beans are done when they are very tender.

Sub to my YouTube channel and follow me on TikTok or Instagram to get notified whenever we have new videos!

Links in this post may be affiliate posts. If you buy an item through an affiliate link, I get a small fee, which helps support this blog!

Categories
TikTok

Kimchi

I’ve been to South Korea exactly once, and it was on a 12-hr layover on the way home from Vietnam.

For the two weeks in Vietnam, we had been wearing shorts and tank tops for the hot, humid weather.

But in Korea it was rainy and cold, so it was a last-minute scramble to figure out what we had with us to layer and keep warm.

I’m not a particularly fashionable person to begin with, but that was pretty bad, even for me.

We took a short tour into Seoul, had a quick meal of Korean food – but you know a few hours is not nearly enough to see a country.

We had big plans to try to go back last year… and well, you know how that went.

South Korea is at the top of our list whenever it’s responsibly save to travel again, but until then I’m bringing Korea to LA… what Korean dishes do you want to see me make?

I’ve made this kimchi recipe that Jen from Use Real Butter adapted from Maangchi a BUNCH of times.

I typically leave out the leek, and sometimes add in some Asian pear, but otherwise we love it! We’ve made it both with and without the fermentation step – Son prefers our kimchi when it tastes fresher, so these days I tend to skip the fermentation.

I usually make a full, or sometimes even a double batch depending on how big my napa cabbage is, but this time around I somehow got the tiniest napa cabbage ever in my grocery delivery! So… I ended up making 1/10th of a batch, which is why in the video, you may notice I skipped some things (because they just didn’t make sense for such a tiny batch!)

Regardless, it was still tasty… but this means I’m going to have to make more kimchi very soon!

Kimchi

from Use Real Butter

Ingredients
  • 5 lbs napa cabbage
  • 1/2 cup salt
  • 1/4 cup sweet rice flour (like Mochiko)
  • 1 1/2 cups water
  • 2 tbsp sugar
  • 1/2 cup garlic, crushed
  • 1 tbsp fresh ginger, minced
  • 1/2 cup onion, cut into medium chunks
  • 1/2 cup fish sauce
  • 1 1/4 cups coarse ground red pepper powder
  • 5 green onions, sliced on the diagonal
  • 1 cup leek, chopped (greens too)
  • 2 cups Korean radish, julienned
  • 1/4 cup carrot, julienned
Cooking Directions
  1. Prepare the cabbage: Remove any wilted outer leaves of the napa cabbage heads. Quarter the heads lengthwise and cut out the cores. Chop the cabbage into bite-size pieces. Place the cabbage in a large bowl of water (use two large bowls if it won’t all fit). Sprinkle the salt over the cabbage (divide it accordingly if you have multiple bowls of cabbage). Turn the cabbage every 30 minutes to get an even brining for a total of 90 minutes. Rinse the cabbage in a large bowl of water three times. Drain the cabbage and set aside until ready to use.
  2. Prepare the paste: Combine the sweet rice flour and water in a small saucepan. Stir over medium high heat until the mixture comes to a boil. Keep stirring until it is bubbling and then add the sugar. Continue to stir until the mixture turns somewhat translucent. Pour into a large, clean bowl. Place the garlic, ginger, and onion in the bowl of a food processor and purée. Add the purée to the sweet rice paste along with the fish sauce and the red pepper powder and mix it all together. Stir in the green onions, leeks, Korean radish, and carrot until the vegetables are well-coated.
  3. Mix and ferment: Add the cabbage to the paste and, wearing disposable gloves, mix by hand until all of the cabbage is evenly coated with the paste. Pack the kimchi tightly into an airtight container (glass jar, plastic tub, etc.). You may have to use multiple containers. Push the kimchi down so the liquid covers the top, but leave at least 1 inch of headspace in the top of the container. We refrigerate/eat our kimchi immediately because we like it fresher, but if you prefer your kimchi fermented then let the kimchi sit on the counter for a day with some sort of plate or bowl to catch any leaking liquid underneath the container. If it is fermenting, there will be gas bubbles developing down in the kimchi which pushes the liquid up and possibly out of the top of your vessel. Open the lid once or twice a day to let the kimchi de-gas and to push the cabbage back down into the vessel. After 2 days, it should start to sour a little (this is good!). If this is the right taste for you, seal it up and place it in the refrigerator to enjoy as you like.

Sub to my YouTube channel and follow me on TikTok or Instagram to get notified whenever we have new videos!

Links in this post may be affiliate posts. If you buy an item through an affiliate link, I get a small fee, which helps support this blog!

Categories
TikTok

Apple Beet Crisp

In high school, a friend once told me, “you know what I hate about you, Allison? It’s that you have no opinions.”

Unsurprisingly we grew apart real fast after high school, but the thing is, she wasn’t wrong.

I spent most of my life being afraid of people judging me. And because of that, I never wanted people to know what I liked, or disliked, or thought about anything, lest they judge me negatively.

Once, when I was in elementary school, my sister told my best friend after school that my favorite song was the Donna Lewis classic, I Love You Always Forever. I was SO mad that I turned around, stuck my tongue out (which was a serious insult at that age)… and then turned around and walked face first into a pole.

There were many tears that day.

I’m far more confident now, but even to this day – my automatic instinct is to be as neutral as possible – lest somebody judge me.

This is my second time making this dish, because I enjoyed it so much the first time around! I made it on my twitch stream last spring, and I’ve seriously been craving it ever since.

It’s healthy and earthy and delicious, especially when served with a hefty scoop of vanilla ice cream or whipped cream.

I was NOT a fan of the vanilla goat cheese yogurt topping that’s a part of the original recipe (too tangy, and I’m while I don’t mind goat cheese in salads, it’s just not my favorite thing), but if you love goat cheese then you might enjoy it.

Vanilla ice cream though… yes that’s extremely my jam.

Apple Beet Crisp

slightly adapted from Food 52

Ingredients

Topping

  • 12 tbsp (3/4 cup) unsalted butter, melted
  • 1 1/4 cups all-purpose flour
  • 1 cup old-fashioned rolled oats
  • 1/2 cup chopped pecans or walnuts
  • 1/2 cup packed light brown sugar
  • 1 1/2 tsp ground cinnamon
  • 1/2 tsp kosher salt

Filling

  • 2 tbsp unsalted butter
  • 1 lb beets (about 4 medium beets), peeled and diced
  • 1 lb apples (about 3 medium apples – I used Fuji), peeled, cored, and diced
  • 1/2 cup packed light brown sugar
  • 1/4 cup freshly squeezed orange juice
  • 1 tbsp cornstarch
  • 2 tsp vanilla extract
  • 2 tsp ground cinnamon
  • 1 tsp ground nutmeg
  • 1/2 tsp ground cloves
Cooking Directions
  1. Position a rack in the middle of the oven and preheat to 350°F (176°C).
  2. To make the topping: Combine flour, oats, melted butter, walnuts, brown sugar, cinnamon, and salt in a large bowl and mix using your hands until large clumps form. Set aside.
  3. To make the filling: Melt butter in a large skillet over medium heat. (If you use a cast-iron, you can use this for baking later, but I don’t have a cast-iron that will fit in my little oven so I used a nonstick skillet.) Add beets and cook, stirring often, until fork-tender and lightly browned on the edges, about 12 minutes. Remove skillet from heat and let cool for 10 minutes.
  4. To the cooled skillet, add apples, brown sugar, orange juice, cornstarch, vanilla, cinnamon, nutmeg, and cloves. Toss to thoroughly coat the apples and beets. (If your skillet is too small or you’re not using it to bake, transfer the mixture into a large bowl, toss to coat, and pour back into the skillet or an 8×8″ baking dish.)
  5. Distribute prepared topping evenly over beets and apple mixture. Bake until the top is lightly browned and the sides are bubbling, about 30 to 40 minutes. Let cool for 20 minutes.

Sub to my YouTube channel and follow me on TikTok or Instagram to get notified whenever we have new videos!

Links in this post may be affiliate posts. If you buy an item through an affiliate link, I get a small fee, which helps support this blog!

Categories
YouTube

Turmeric eggs with bacon, yogurt, and kale

I came from a perfectly happy family. I had a normal, happy childhood. Nothing traumatizing. I like to think I was a perfectly normal child.

Except that in kindergarten, during playtime, when all my friends would want to play house, I would lay on my back under the little dining room table, and happily proclaim that “I’m the dead person under the table!”

I have absolutely no clue where I got this from, because I’m fairly certain I’d never seen a dead person in my life, and my parents absolutely never would have let me watch that sort of movie or tv show at that age.

But for some reason, I thought it was a must for every pretend house to have a dead person under the table, and I was ready to volunteer myself for that role.

I was also the kid who, totally innocently, would sing, “it’s a small world after life…” which my dad told me many years later, completely freaked him out.

But, you know, aside from that, I was a happy, perfectly normal kid! Nothing disturbing here, I promise.

This egg dish was tasty! … but I probably wouldn’t make it again.

Maybe it’s just me but eggs with yogurt is just… odd. Not my favorite combination.

And while the completed dish was enjoyable, overall it was just fussier than I’d prefer – more work than I feel like it’s worth.

Turmeric eggs with bacon, yogurt, and kale

slightly adapted from Epicurious

Ingredients
  • 4 slices bacon
  • 1 bunch kale, ribs and stems removed, leaves torn into large pieces
  • kosher salt
  • 1 cup plain Greek yogurt
  • 3 tbsp extra-virgin olive oil
  • 4 large eggs
  • 1/2 tsp ground turmeric
  • Urfa pepper or other mild red pepper flakes and lime wedges (for serving)
Cooking Directions
  1. Place a rack in middle of oven and preheat to 375°F. Bake bacon on a foil-lined rimmed baking sheet until brown and crisp, 10–12 minutes. Tear into large pieces; reserve fat for another use.
  2. Toss kale with the baked bacon and bacon fat. Bake, tossing halfway through, until lightly browned around edges and crisp-tender, 5–7 minutes.
  3. Season yogurt with salt. Divide among plates and top with bacon and kale.
  4. Heat olive oil in a large nonstick skillet over medium-high. Add eggs one at a time, shaking skillet between additions to keep them from sticking together. Cook, tilting skillet toward you and spooning oil over egg whites until whites are set, about 2 minutes. Remove skillet from heat, keeping skillet tilted, and add turmeric to oil. Baste egg whites with turmeric oil.
  5. Divide eggs among plates and drizzle turmeric oil over. Sprinkle with red pepper flakes and squeeze limes over.

Sub to my YouTube channel and follow me on TikTok or Instagram to get notified whenever we have new videos!

Links in this post may be affiliate posts. If you buy an item through an affiliate link, I get a small fee, which helps support this blog!

Categories
YouTube

Winter vegetable soup

Feeding people is my love language. And I don’t just mean shoving food in someone’s face. For me, it’s all about making them feel cared for. Knowing that their allergies or dietary choices are going to be respected. Feeling like it’s safe for them to eat without judgement or fear of bad reactions.

Whenever I know I’m going to cook for somebody, I immediately demand to know their food allergies, dietary restrictions, likes and dislikes. And most of the time people are like, oh no it’s fine, but I don’t care if you don’t want to be a bother, I’m gonna accommodate the heck out of you.

And besides – it’s a fun cooking challenge for me to come up with something absolutely delicious that I know everyone can eat. Because you don’t make someone feel cared for by forcing your own preferences upon them. You make them feel cared for by respecting their own.

This is a healthy, hearty, totally vegan vegetable soup that’s great in winter!

The original recipe blended part of the soup to make it more of a chowder, which I imagine would be delicious. Personally I just hate blending soups (messy splattering hot things and more dishes to clean? no thank you!) so I skipped that part, but if you don’t mind so much then go for it!

Winter Vegetable Soup

adapted from The First Mess

Ingredients
  • 1 tbsp olive oil
  • 1 large onion, diced (1 3/4 cups)
  • 1 leek, white and light green parts diced
  • 5 cloves of garlic, minced
  • leaves of 5 thyme sprigs, chopped
  • 2 parsnips, peeled and chopped (1 1/2 cups)
  • 1/2 celery root, peeled and chopped (1 1/2 cups)
  • 2 cups chopped cauliflower florets
  • 1 1/2 tbsp grainy mustard
  • salt + pepper to taste
  • 4 cups vegetable stock
  • fried onions, for topping
Cooking Directions
  1. Heat the olive oil in a large, heavy soup pot over medium heat. Add the diced onions to the pot and sauté until soft and translucent, about 4-5 minutes. Add the leeks and continue to sauté until the leeks are soft, about 4 minutes more. Add the minced garlic and thyme to the pot and cook until fragrant, about 1 minute, stirring constantly. Add the chopped parsnips, celery root, and cauliflower florets to the pot and stir to coat in the oil. Add the grainy mustard, and salt + pepper to taste. Stir to coat all the vegetables in spice. Add the vegetable stock to the pot, stir again, cover and bring to a boil. Once boiling, remove the lid and lower heat to simmer. Let the chowder cook and bubble until the parsnips and celery root pieces are tender, about 15-18 minutes.
  2. Serve hot, topped with fried onions.

Sub to my YouTube channel and follow me on TikTok or Instagram to get notified whenever we have new videos!

Links in this post may be affiliate posts. If you buy an item through an affiliate link, I get a small fee, which helps support this blog!

Categories
YouTube

Creamy Chickpeas with Runny Eggs and Prosciutto

My mother is an extremely crafty woman. And I don’t mean sly, I mean she is ridiculously good at making things, and I have always aspired to her level of creativity.

When I was in first grade, she made barrettes for my hair. She’d use different types of ribbon and curl it or tie it in bows, and let me tell you I thought I was the shit because I had the coolest barrettes in all of first grade.

At some point she got into making wreaths, and we eventually had a different wreath for every month, that would go up on our front door.

And then there were the cards. Oh my gosh the cards. Normal families might send out Christmas cards every year. But my mom? My mom would make these absolutely gorgeous homemade, hand-stamped cards for every single holiday. Valentine’s cards. Easter cards. Independence Day cards. Halloween cards. I have no idea how she managed it all, but she was an absolute superwoman when it came to crafting.

This dish is soooo good.

I don’t often have prosciutto on hand so I won’t make it on a regular basis, but it took me by surprise how tasty it is.

The chickpeas add heft (and definitely make this into a healthy dish… really!), and it’s so creamy. The dish is super flavorful, but I’m not sure where the title thinks it’s getting spice from, because it’s… not. (or maybe my paprika just isn’t spicy enough?)

The prosciutto adds just enough meaty umami to make it satisfying, and you definitely want to serve this with some sort of bread to sop up the runny yolks and tomato cream sauce!

Creamy Chickpeas with Runny Eggs and Prosciutto

ever so slightly adapted from Epicurious

Ingredients
  • 2 tbsp extra-virgin olive oil
  • 2 garlic cloves, thinly sliced
  • 1 (15oz) can chickpeas, rinsed
  • 1 tbsp tomato paste
  • 1 tsp sweet smoked paprika
  • 1 cup heavy cream
  • kosher salt, freshly ground pepper
  • 2 large eggs
  • 4 thin slices of prosciutto
  • flaky sea salt (optional)
  • flatbread or a baguette (for serving)
Cooking Directions
  1. Heat oil in a medium skillet over medium. Cook garlic, tossing, until garlic is golden brown, about 2 minutes.
  2. Add chickpeas, tomato paste, and paprika to skillet and cook, stirring often, until coated, about 1 minute. Mix in cream, season with kosher salt and lots of pepper, and bring to a simmer.
  3. Crack eggs into chickpea mixture and season them with kosher salt. Cover (a baking sheet works great if you don’t have a matching lid) and cook until white parts of eggs are set but yolks are still runny, about 2 minutes. Remove from heat and drape prosciutto around eggs. Sprinkle with sea salt, if desired, and more pepper. Serve with flatbread.

Sub to my YouTube channel and follow me on TikTok or Instagram to get notified whenever we have new videos!

Links in this post may be affiliate posts. If you buy an item through an affiliate link, I get a small fee, which helps support this blog!

Categories
YouTube

Sticky Toffee Pancakes

Every other day, it was cereal for breakfast, but Sundays were “Special Breakfast” days in our family.

The vast majority of the time it would start with the ever-present box of Bisquick – as kids, we would stand on the wooden stepstool my dad built, and crank the eggbeater to help dad mix the batter for pancakes or waffles. Sometimes we’d have French toast instead, or blueberry muffins, and once in a blue moon mom would buy the pillsbury can of biscuits, cut out the centers, and fry them up as cinnamon-sugar doughnuts.

There’d be sausage or bacon on the side, and eggs – always scrambled. Orange juice to drink, and don’t forget to eat your chewable Flintstone vitamin – pink was the best, although let’s be honest they were all terrible.

Sundays were also cleaning days. Dad would blast classical music throughout our little house, grab his caddy full of cleaning supplies, and take care of any housework or yardwork that needed doing that week.

I never realized until now how much I miss those Sunday traditions. Who wants to join me for some pancakes and classical cleaning?

I first tried this pancake recipe on my old Twitch stream back in 2017, and I was instantly obsessed – so much that I made them for Christmas that year, and then again for our socially-distanced Christmas of just the two of us this year.

It’s super decadent, absolutely a treat sort of breakfast (pun totally not intended, given that we ate this with the treet and eggs I posted a few days ago).

The pancakes are delicious all by themselves, cozy and full of warm spices. And the toffee sauce puts it over the top, into exactly the sort of overindulgent breakfast you want on a Christmas morning!

Sticky Toffee Pancakes

from Lady and Pups

Ingredients

Toffee Sauce

  • 1/2 cup (93g) dark brown sugar
  • 1/2 cup (169g) honey
  • 1/4 cup (56g) heavy cream
  • 3 tbsp (42g) unsalted butter
  • 1/2 tsp brandy
  • 1/4 tsp sea salt
  • 1/4 tsp vanilla extract

Pancake Batter

  • 1 large egg white + 1/8 tsp cream of tartar
  • 1 cup (230g) whole milk
  • 2 tbsp (42g) molasses
  • 1 large egg yolk
  • 1/2 tsp grated ginger
  • 2 tbsp (27g) unsalted butter, melted
  • 1 1/4 cup (168g) preferably cake flour, but all-purpose flour is fine
  • 1 tbsp (12g) light brown sugar
  • 2 1/2 tsp baking powder
  • 1/4 tsp ground cinnamon
  • 1/4 tsp ground allspice
  • canola oil and unsalted butter for cooking
Cooking Directions
  1. TO MAKE THE TOFFEE SAUCE: Combine everything but the vanilla extract in a small pot and set over medium heat. Bring to a gentle boil and cook for 3-4 min, stirring occasionally. Turn off the heat and stir in the vanilla. Set aside.
  2. TO MAKE THE PANCAKES: In a clean bowl with hand-held mixer, whisk together the egg white and cream of tartar on high speed until stiff peaks form. It should look like at least tripled in volume. Set aside.
  3. In another large bowl, whisk together the milk, molasses, egg yolk and grated ginger until even. Sift flour, light brown sugar, baking powder, ground cinnamon, and allspice directly into the wet ingredient. Then add the melted butter and stir everything together with a fork just until it comes together into a thick batter. Fold the beaten egg white into the batter with a spatula in 3 additions, just until even. Try not to overwork the batter too much.
  4. Using a flat non-stick skillet with lid, heat 1 tbsp of canola oil and 1 tbsp of unsalted butter over medium heat. Once the butter starts to bubble, spoon the batter onto the skillet. Cover and turn the heat down to medium-low, and cook for 2+ min, until the first side of the pancake is golden-brown. The steam inside the skillet will help cook the pancakes faster, and I find that it better retains the height of the pancakes as well. Now remove the lid and flip the pancake over. Turn the heat back to medium and cook, uncovered, until the second side is golden-brown as well. Repeat until all the batter is used, and add more canola oil and unsalted butter as needed.
  5. Reheat the toffee sauce to loosen the consistency if needed, and serve immediately with pancakes.

Sub to my YouTube channel and follow me on TikTok or Instagram to get notified whenever we have new videos!

Links in this post may be affiliate posts. If you buy an item through an affiliate link, I get a small fee, which helps support this blog!